Step by step to your first webinar — live in under an hour, with zero tech frustration. Everything you need is in this booklet.
3-step setupReady-made webinars from the catalog10 languages
Contents
1Sign in & first overview
2Step 1 — Your webinar
📹Hosting your video (Bunny.net)
3Step 2 — Video & dates
4Step 3 — E-mails
5Use a ready-made webinar from the catalog
6Sign-up pages & split test
7Embed on your own website
8Chat script & offer button
9Referral program & affiliate IDs
10Statistics, sharing & account
11Cheat sheet
How to read this manual: Each page is one topic. Just work through the numbered steps from top to bottom. The images show you exactly where to click. You can also print this booklet (A4) and keep it next to your screen.
Enter e-mail and password. If you have two-factor security on, then enter the 6-digit code from your authenticator app.
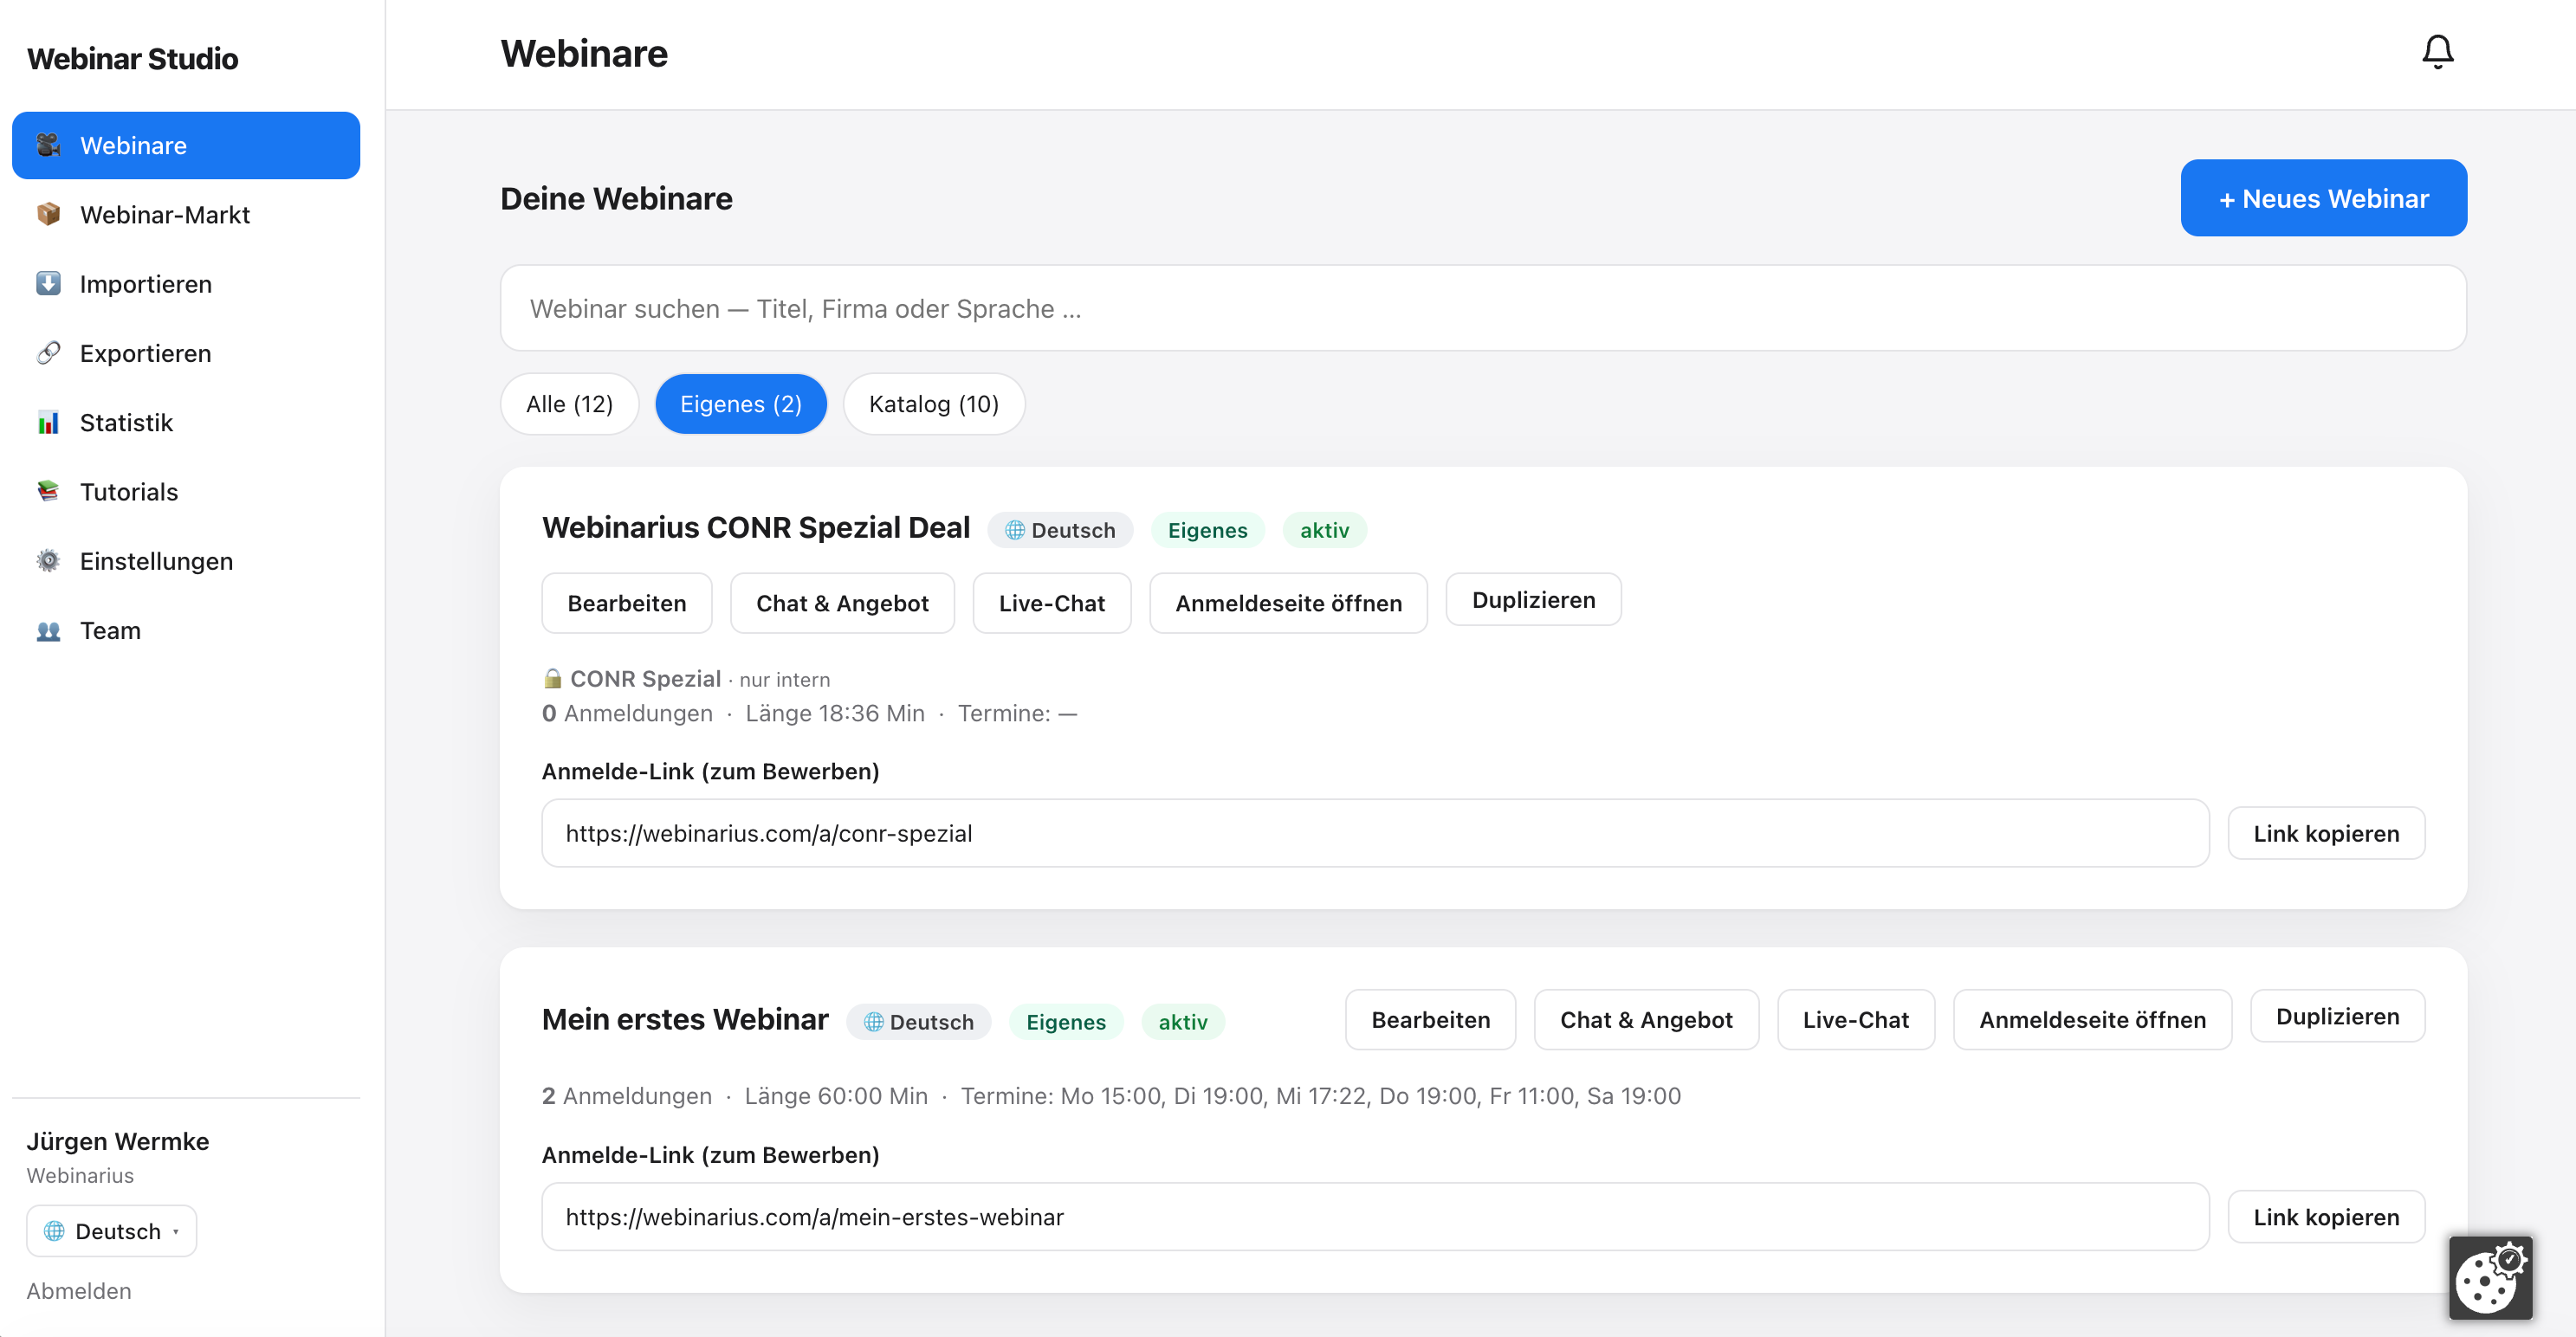
You land on the overview of your webinars. Here you see all your webinars and create new ones.
Forgot your password? No problem — on the sign-in page, below the login button, click “Forgot your password?”, enter your e-mail address and submit. You’ll get an e-mail with a link right away. For security it’s valid for 1 hour and can be used only once — click it, set a new password, done.
The home screen with the list of your webinars and the “+ New webinar” button.
On every webinar in the list you'll find these buttons:
Edit
Opens the 3-step setup (chapters 2–4).
Chat & Offer
Chat script, greeting and offer button (chapter 8).
Read live
Shows you the real messages of a running session.
Duplicate
Makes a complete copy — perfect for a time-limited offer.
Tip: Brand new? Click “+ New webinar” at the top and follow this manual chapter by chapter. After chapter 4 your first webinar is running.
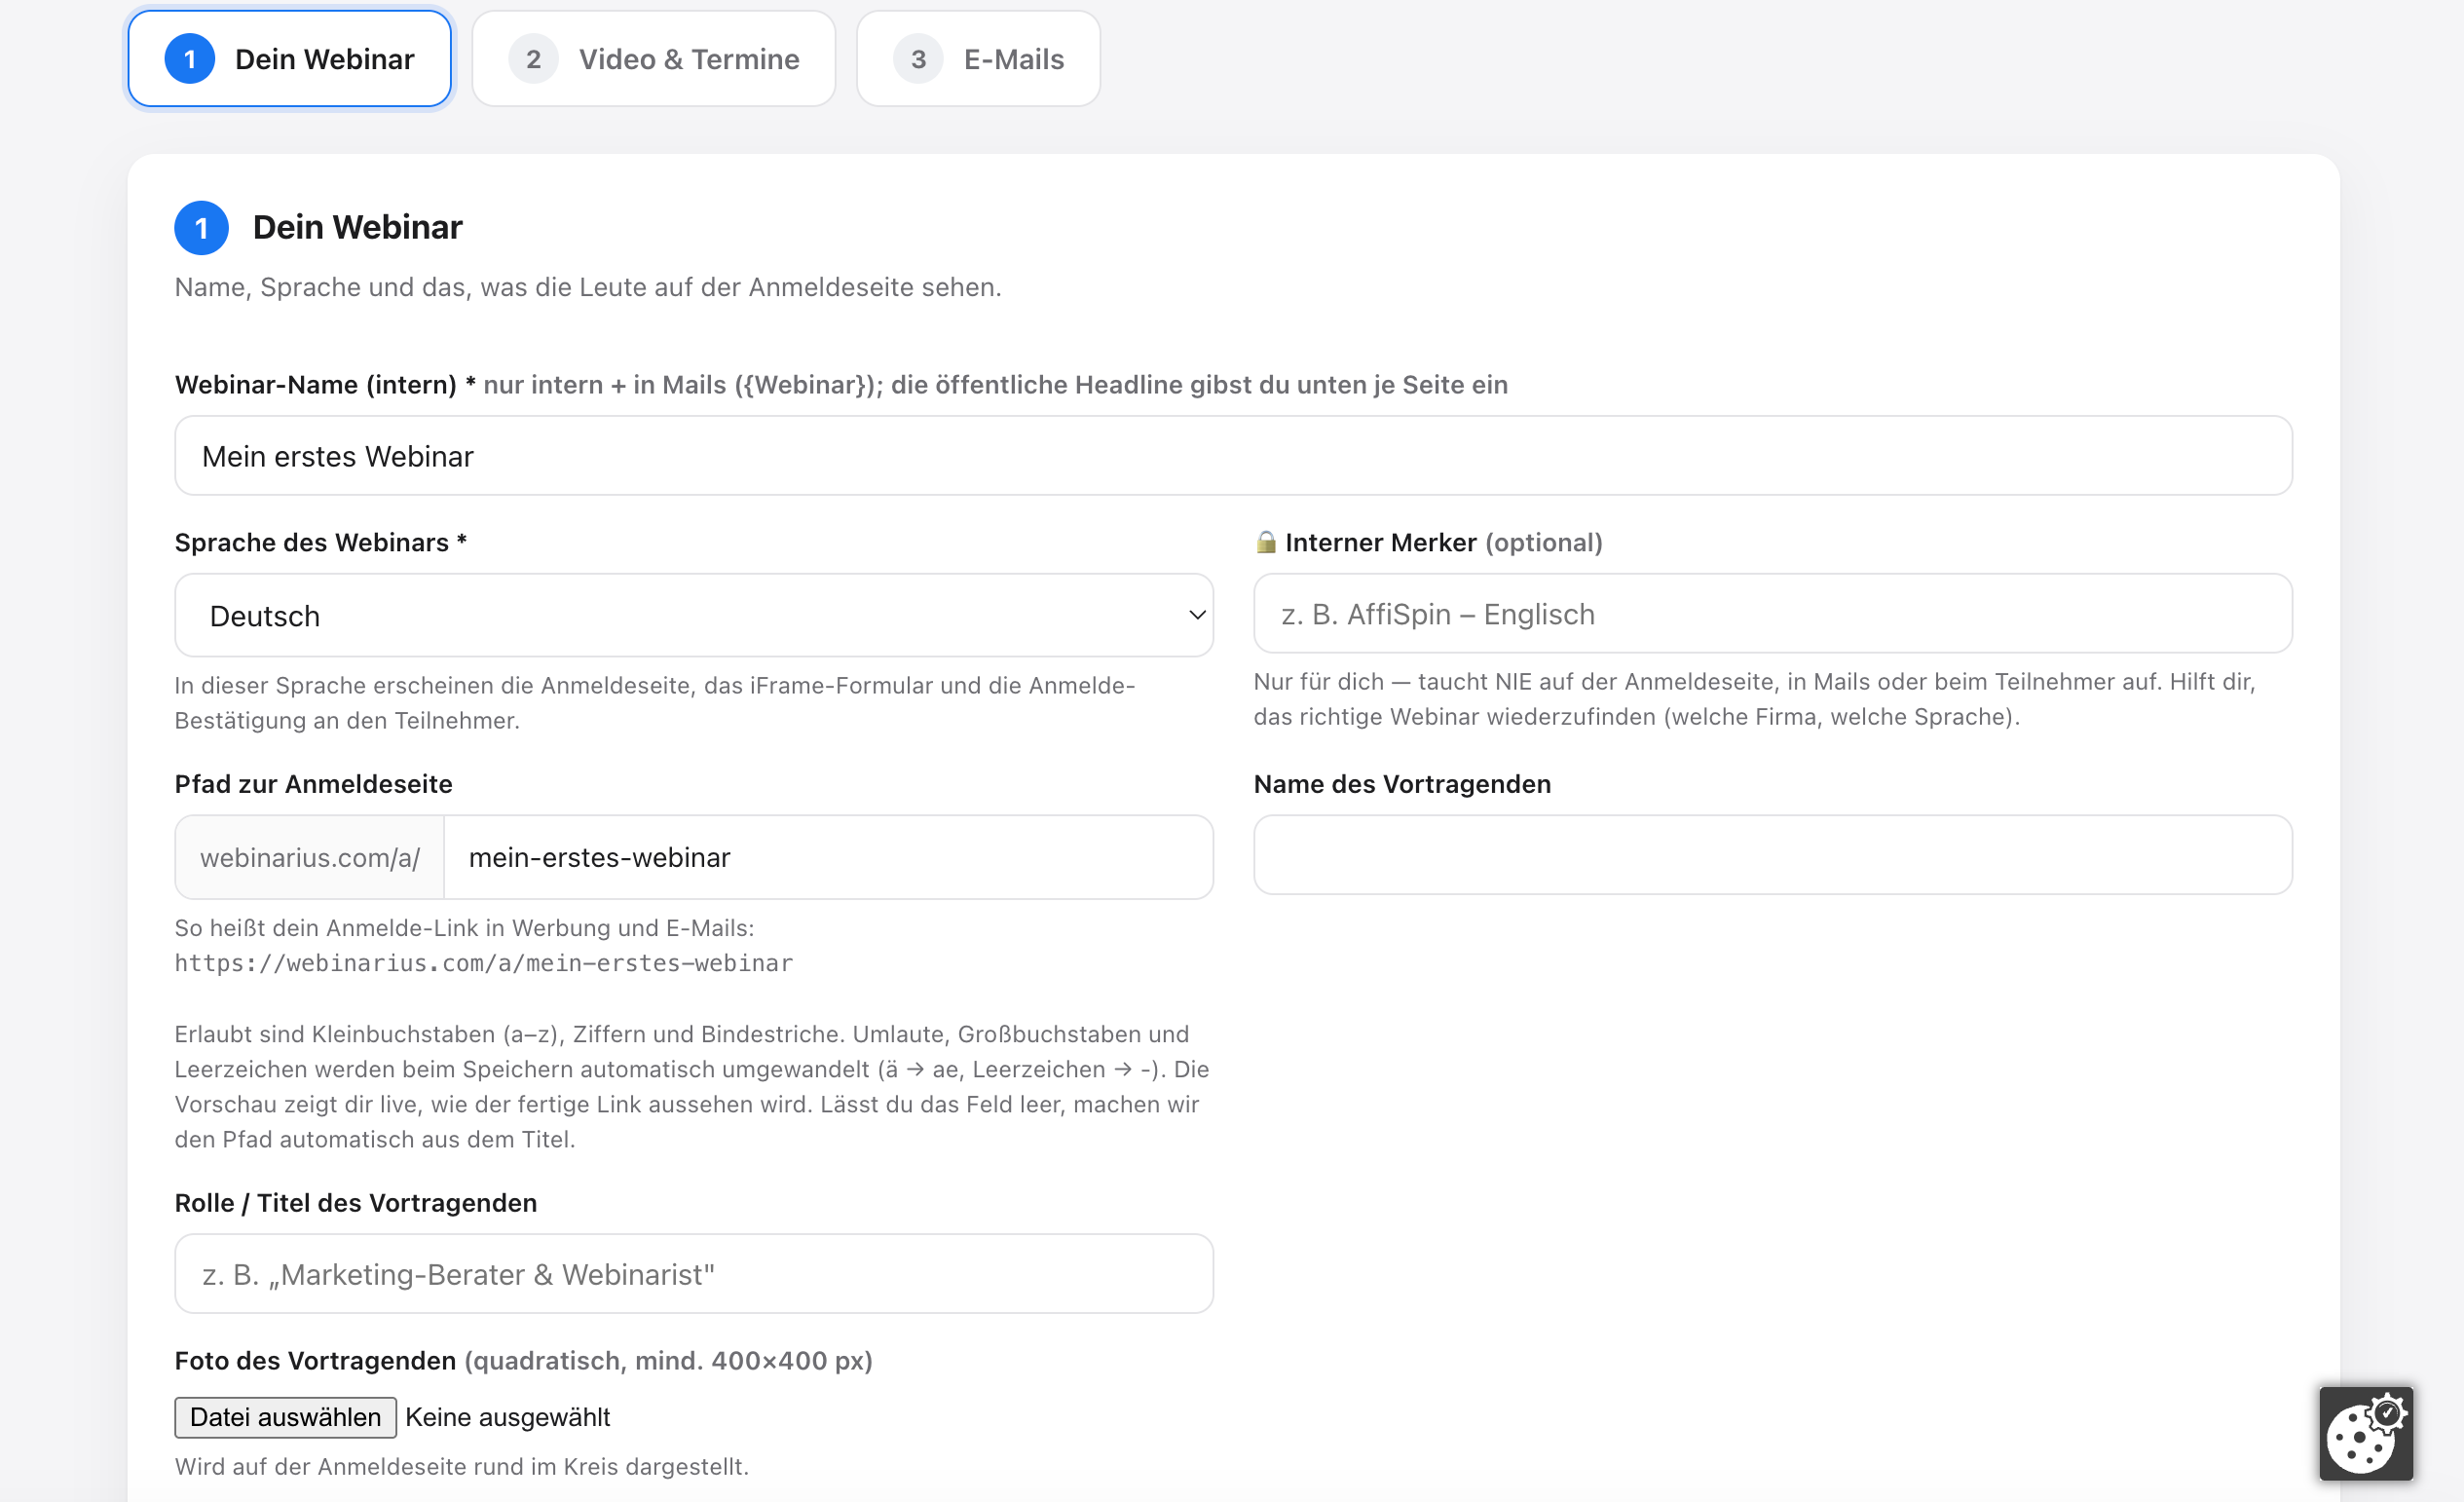
Title, description and the look of your sign-up page.
Enter the title — the big headline your visitors see first.
Write the description. Above the text field you have a small word processor (bold, lists, links, images) and an HTML toggle if you want to design it yourself.
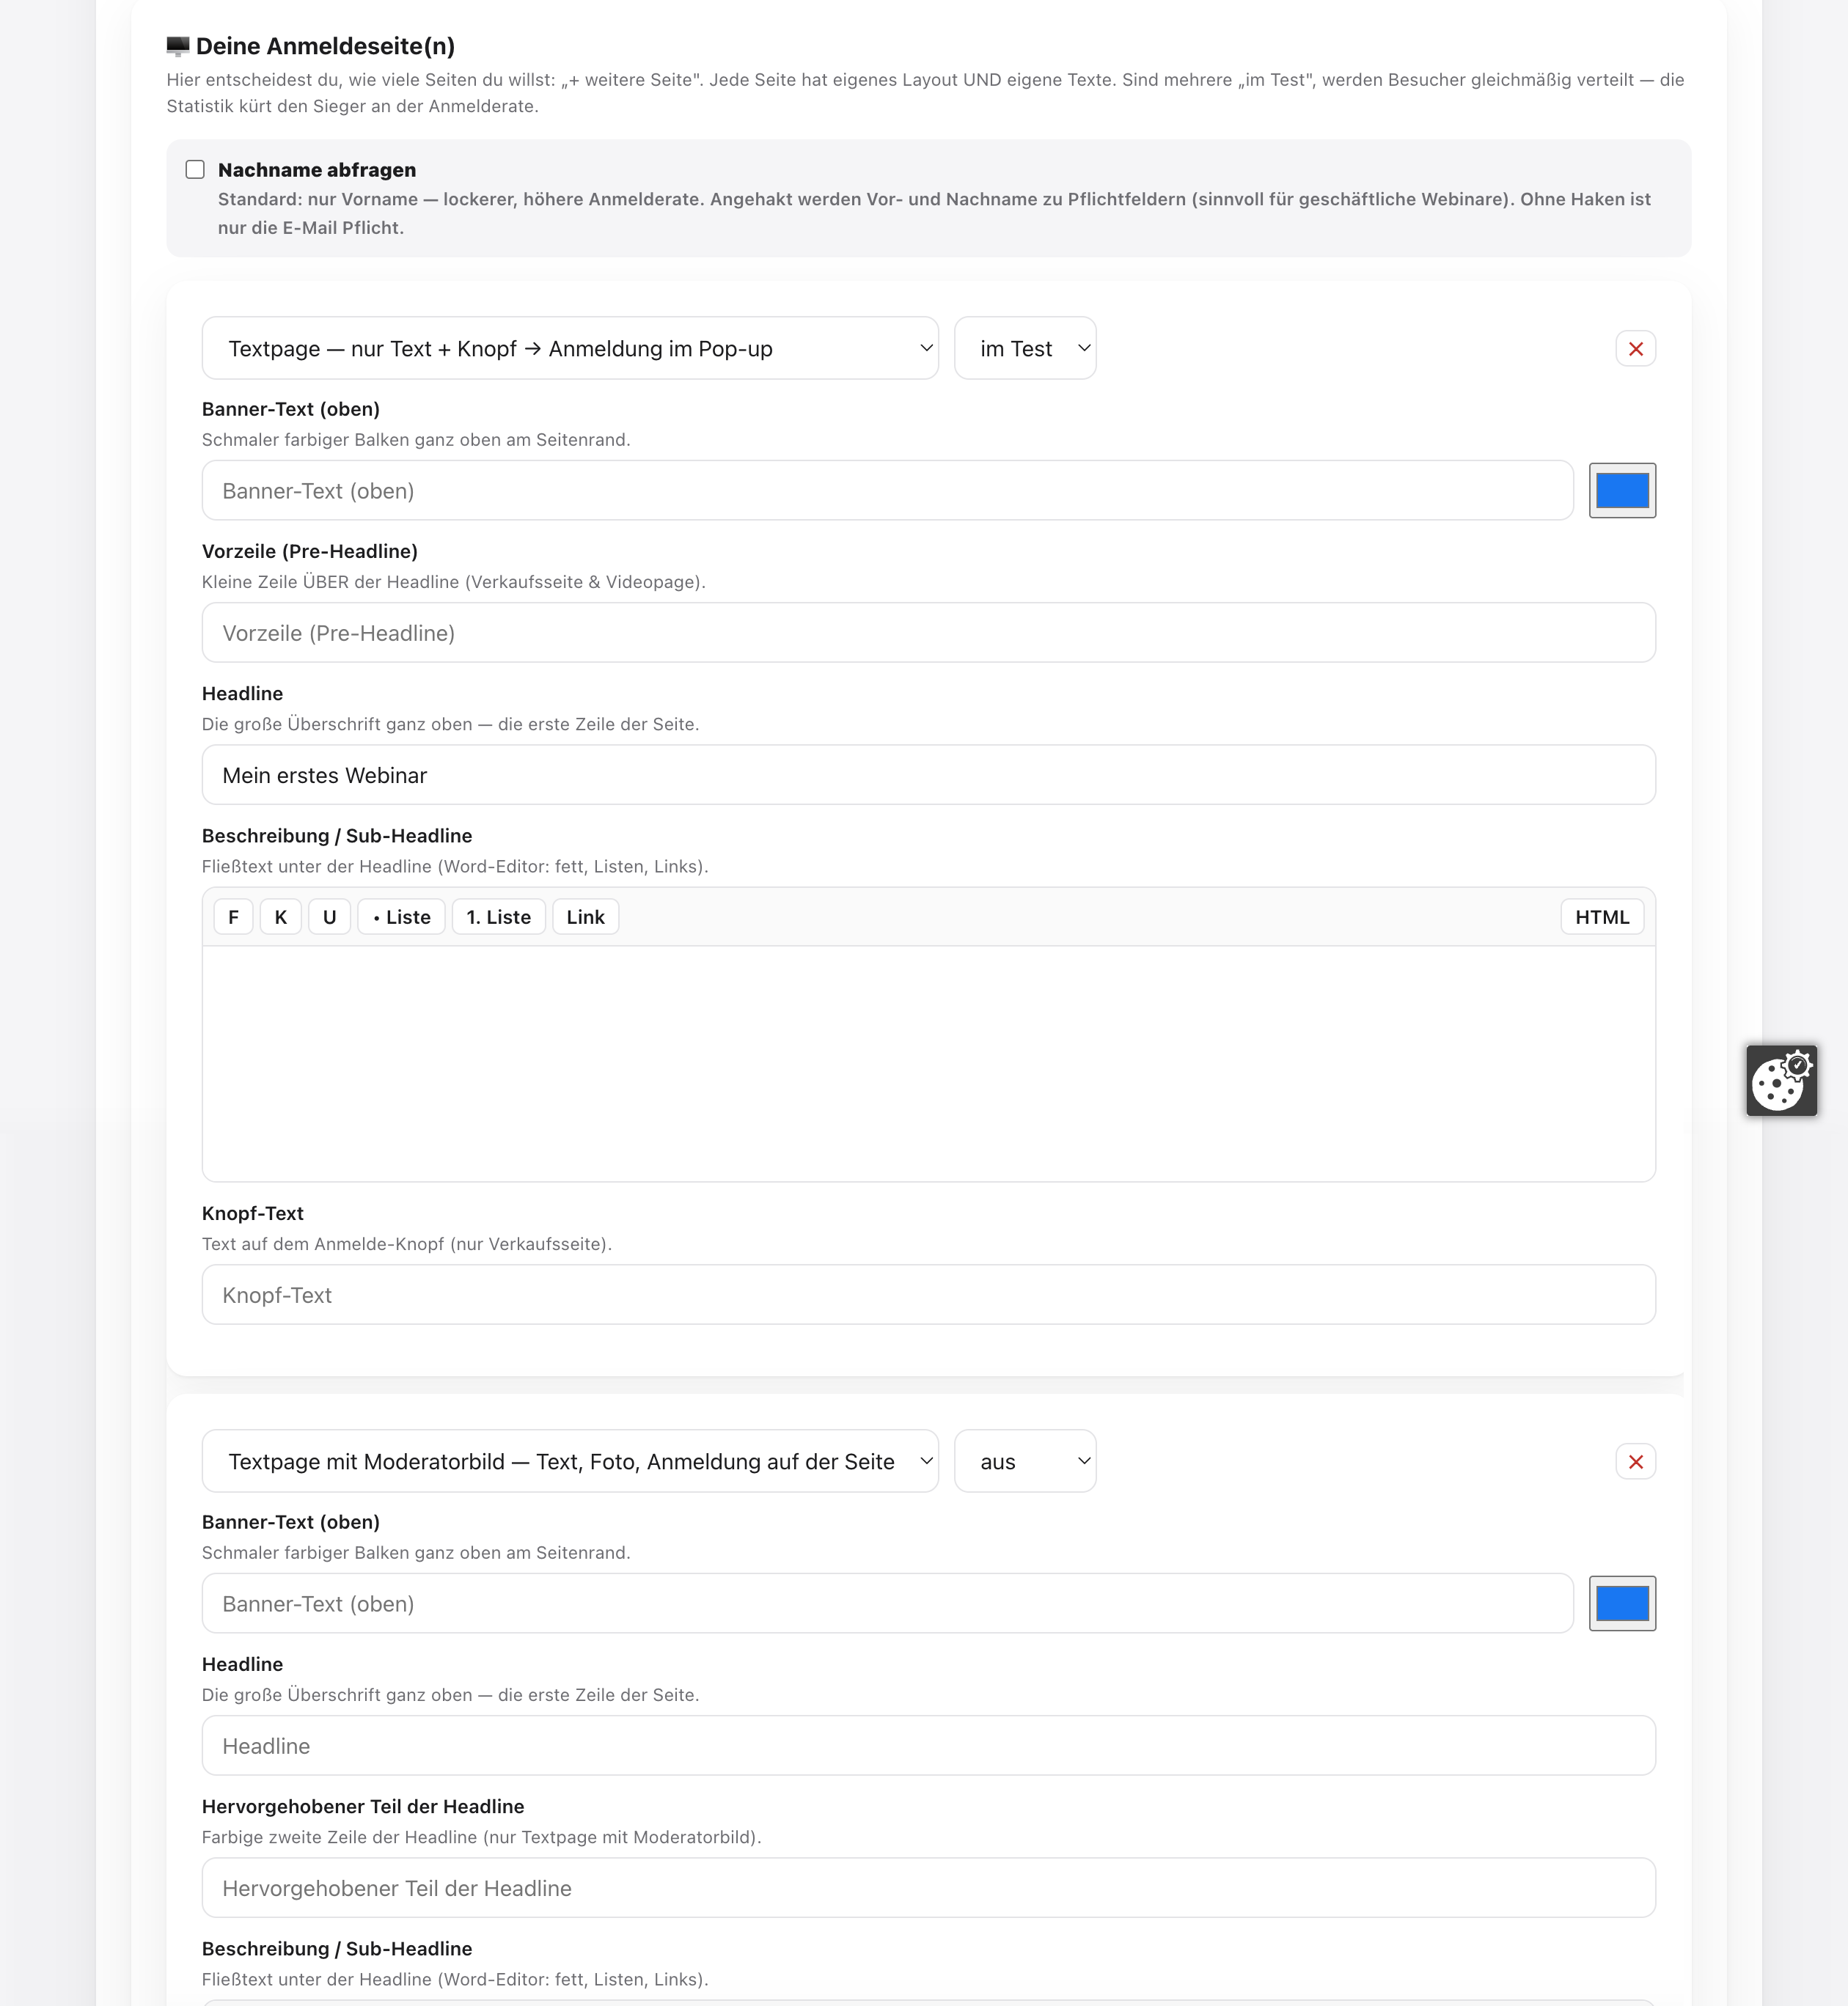
Choose a sign-up page & address. Pick a layout — “text + button only”, “with host photo” or “video page” (test several against each other via “+ add another page”, chapter 6). Below, under “Path to the sign-up page”, pick the web address from the available domains — over 20 to choose from.
Optional: tick Ask for last name if you want first and last name (otherwise the e-mail is enough).
At the bottom, click “Continue to Video & Dates →”.
Title, description with word/HTML editor, and the choice of sign-up page.
Inserting images: The word editor has an image button 🖼 — upload an image (it's shrunk automatically, saving storage) or paste an image address, optionally with a link attached. The same editor is also in your e-mails (chapter 4).
The Steve Jobs rule: Sell the result, not the tool. In the description, write what your visitor can do afterwards — not which features the software has.
Before you enter the video address in Step 2: where should your video live?
Webinar Studio plays your video — but it is not stored with us, it lives with a video host of your choice. From there you grab the MP4 address that you then enter in Step 2. So you need a place that delivers your video reliably.
Why this is special for webinars: Unlike a normal website or a course, webinars run in bursts at fixed times — many viewers watch at once. Most video platforms (e.g. Vimeo) have a fair-use rule: with such load peaks your video can be throttled or blocked. Whatever the provider — in the end it always has to stay fair. That's exactly why a host where you only pay for actual usage is the safest choice.
Our recommendation: Bunny.net. You only pay for what you really use — no subscription limit, no “fair-use” risk. The cost is barely noticeable, and a traffic problem simply doesn't exist.
About $0.01 per GB per month. A single webinar video costs practically nothing to store.
Delivery (when it's watched)
About $0.01 per GB (Europe/North America), and in the volume plan even $0.005 per GB. Just a $1/month minimum, no other fixed costs.
A hands-on example: A 500 MB video watched 1,000 times a month (= 500 GB of delivery) costs you around $2.50–5.00 per month. Storing the file itself: under 1 cent.
A WeSoMatic customer? To get started you can also host your videos there. But mind the fair-use policy: because of the bursty webinar streaming (everyone at the same time), you hit limits faster than with a normal site or course. For permanently worry-free streaming, a usage-based host like Bunny stays the fairest solution.
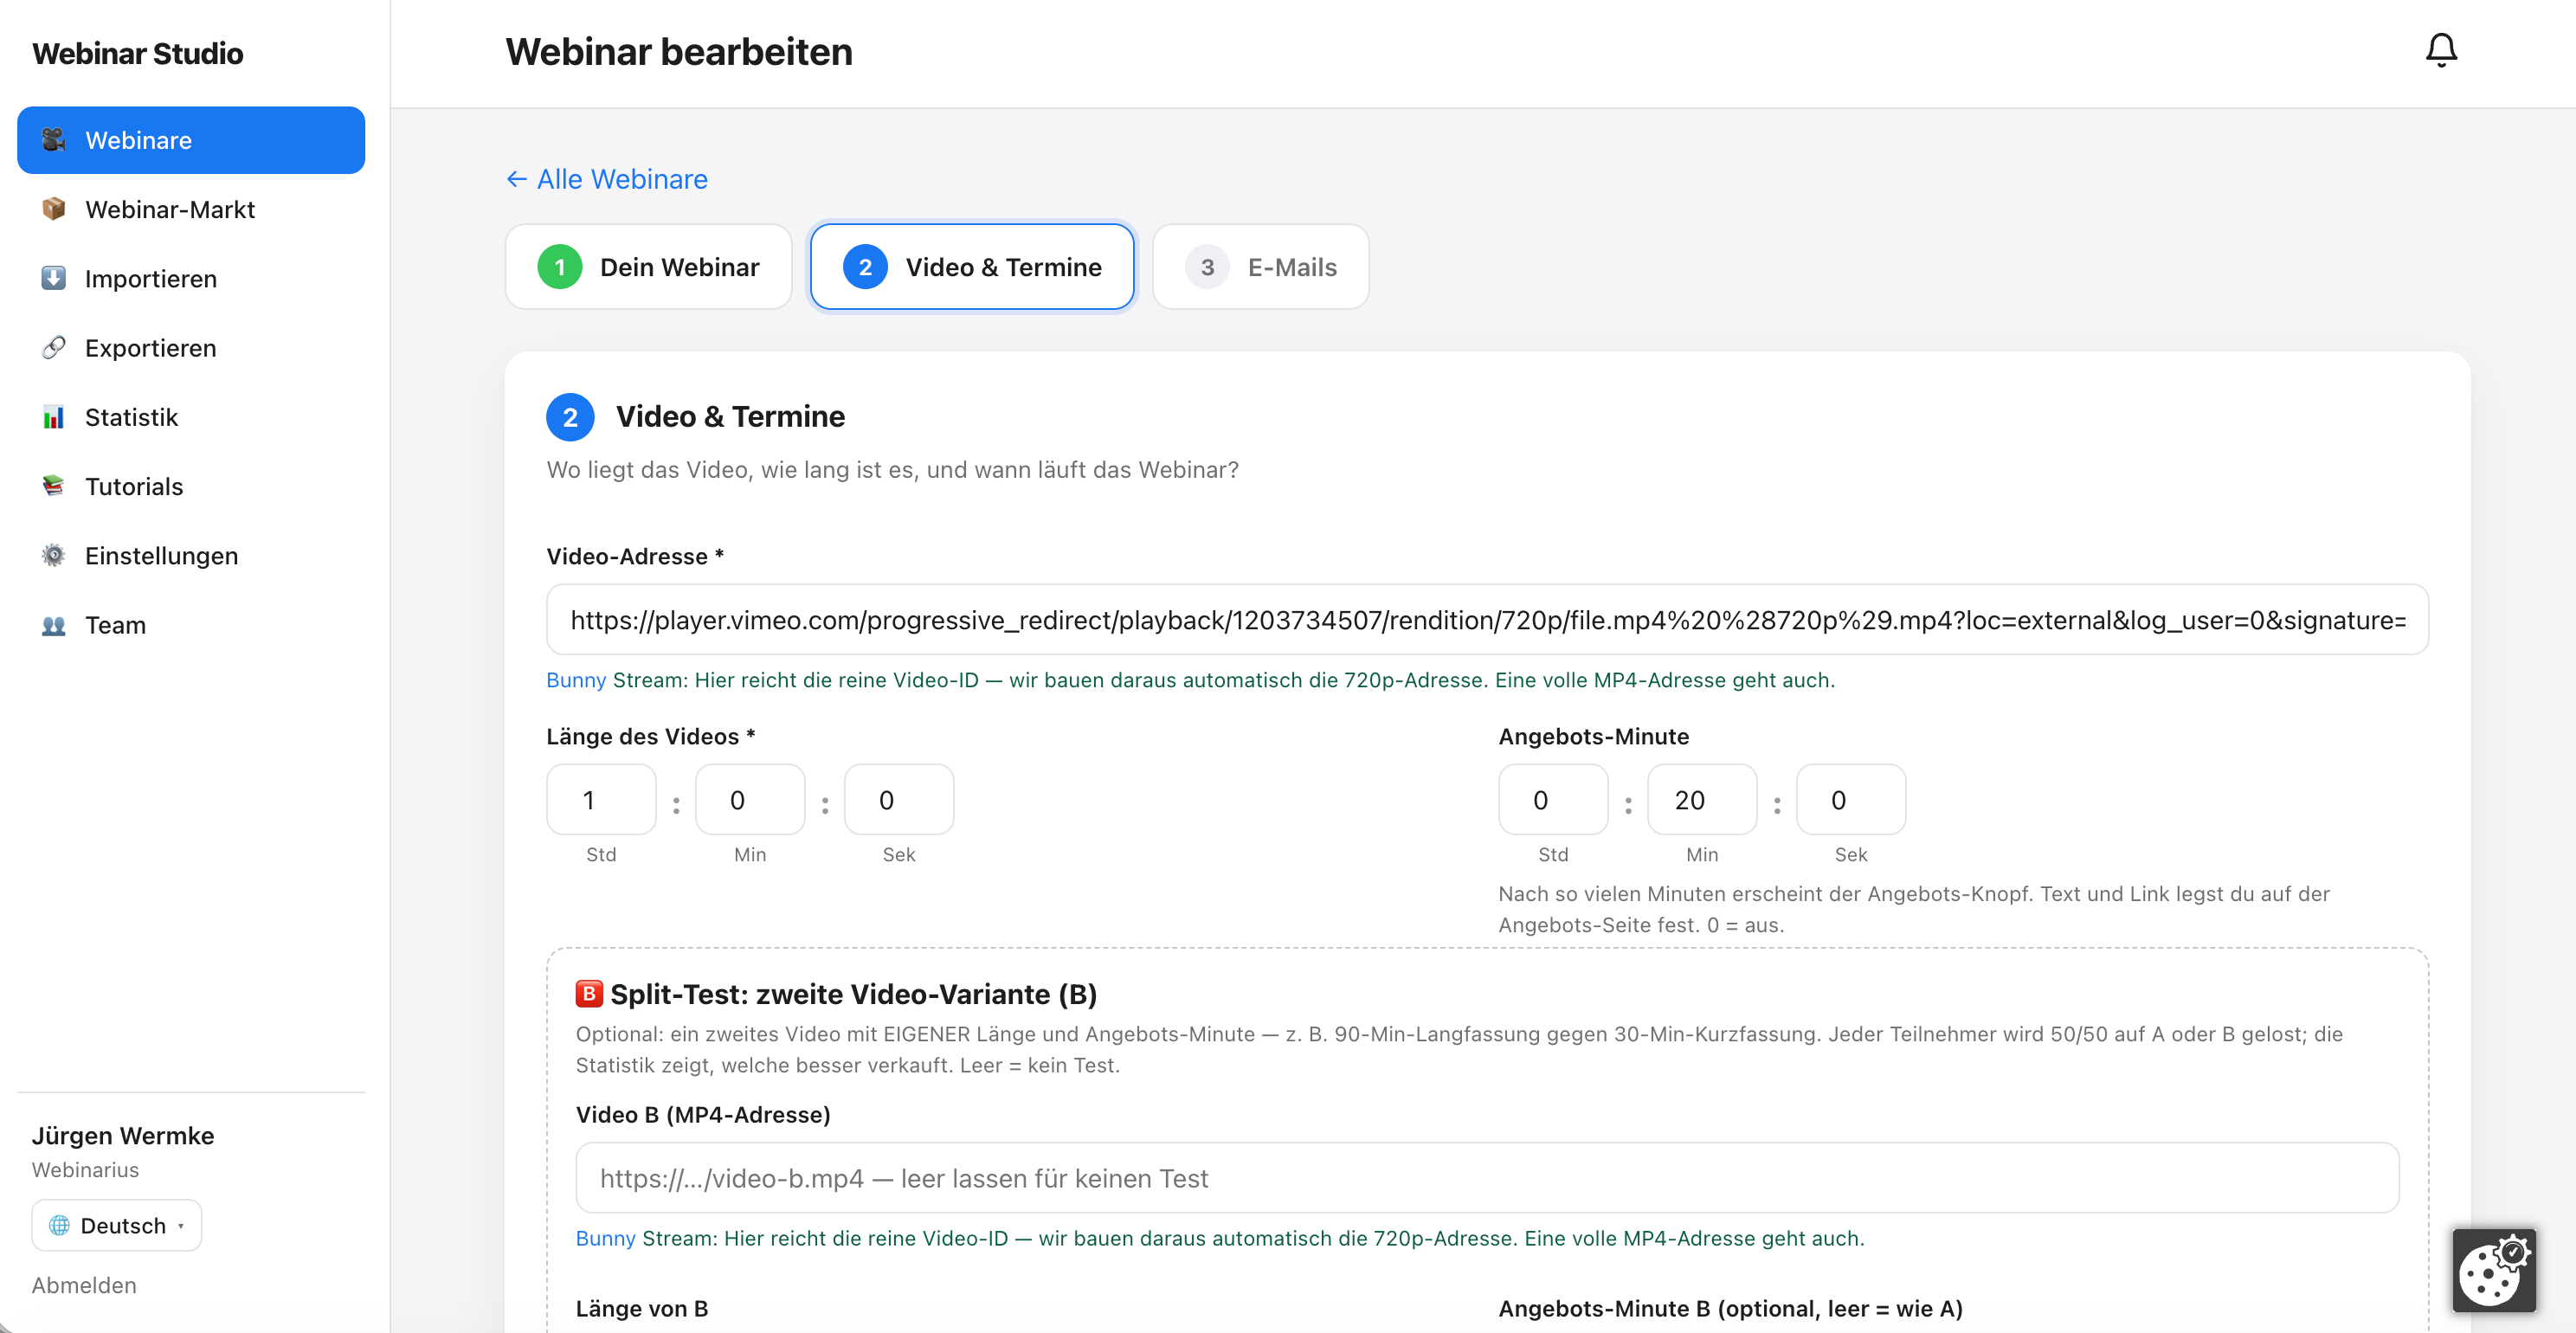
Where your video lives, how long it is, and when your webinar runs.
Top: your video.
Paste the video address (an MP4 address; with Bunny the video ID is enough).
Enter the video length (hrs : min : sec) — that's how the system knows when the webinar ends.
Offer minute: after this many minutes your order button appears in the room. (You set the button's text and link under “Chat & Offer” — chapter 8.)
Optional split test (Video B): a second video with its own length and its own offer minute. Each visitor randomly gets A or B — the statistics show which one sells better.
Good to know: Video A and Video B are built the same way — each has its own length and offer minute right below it. If you don't run a test, you simply fill in A only.
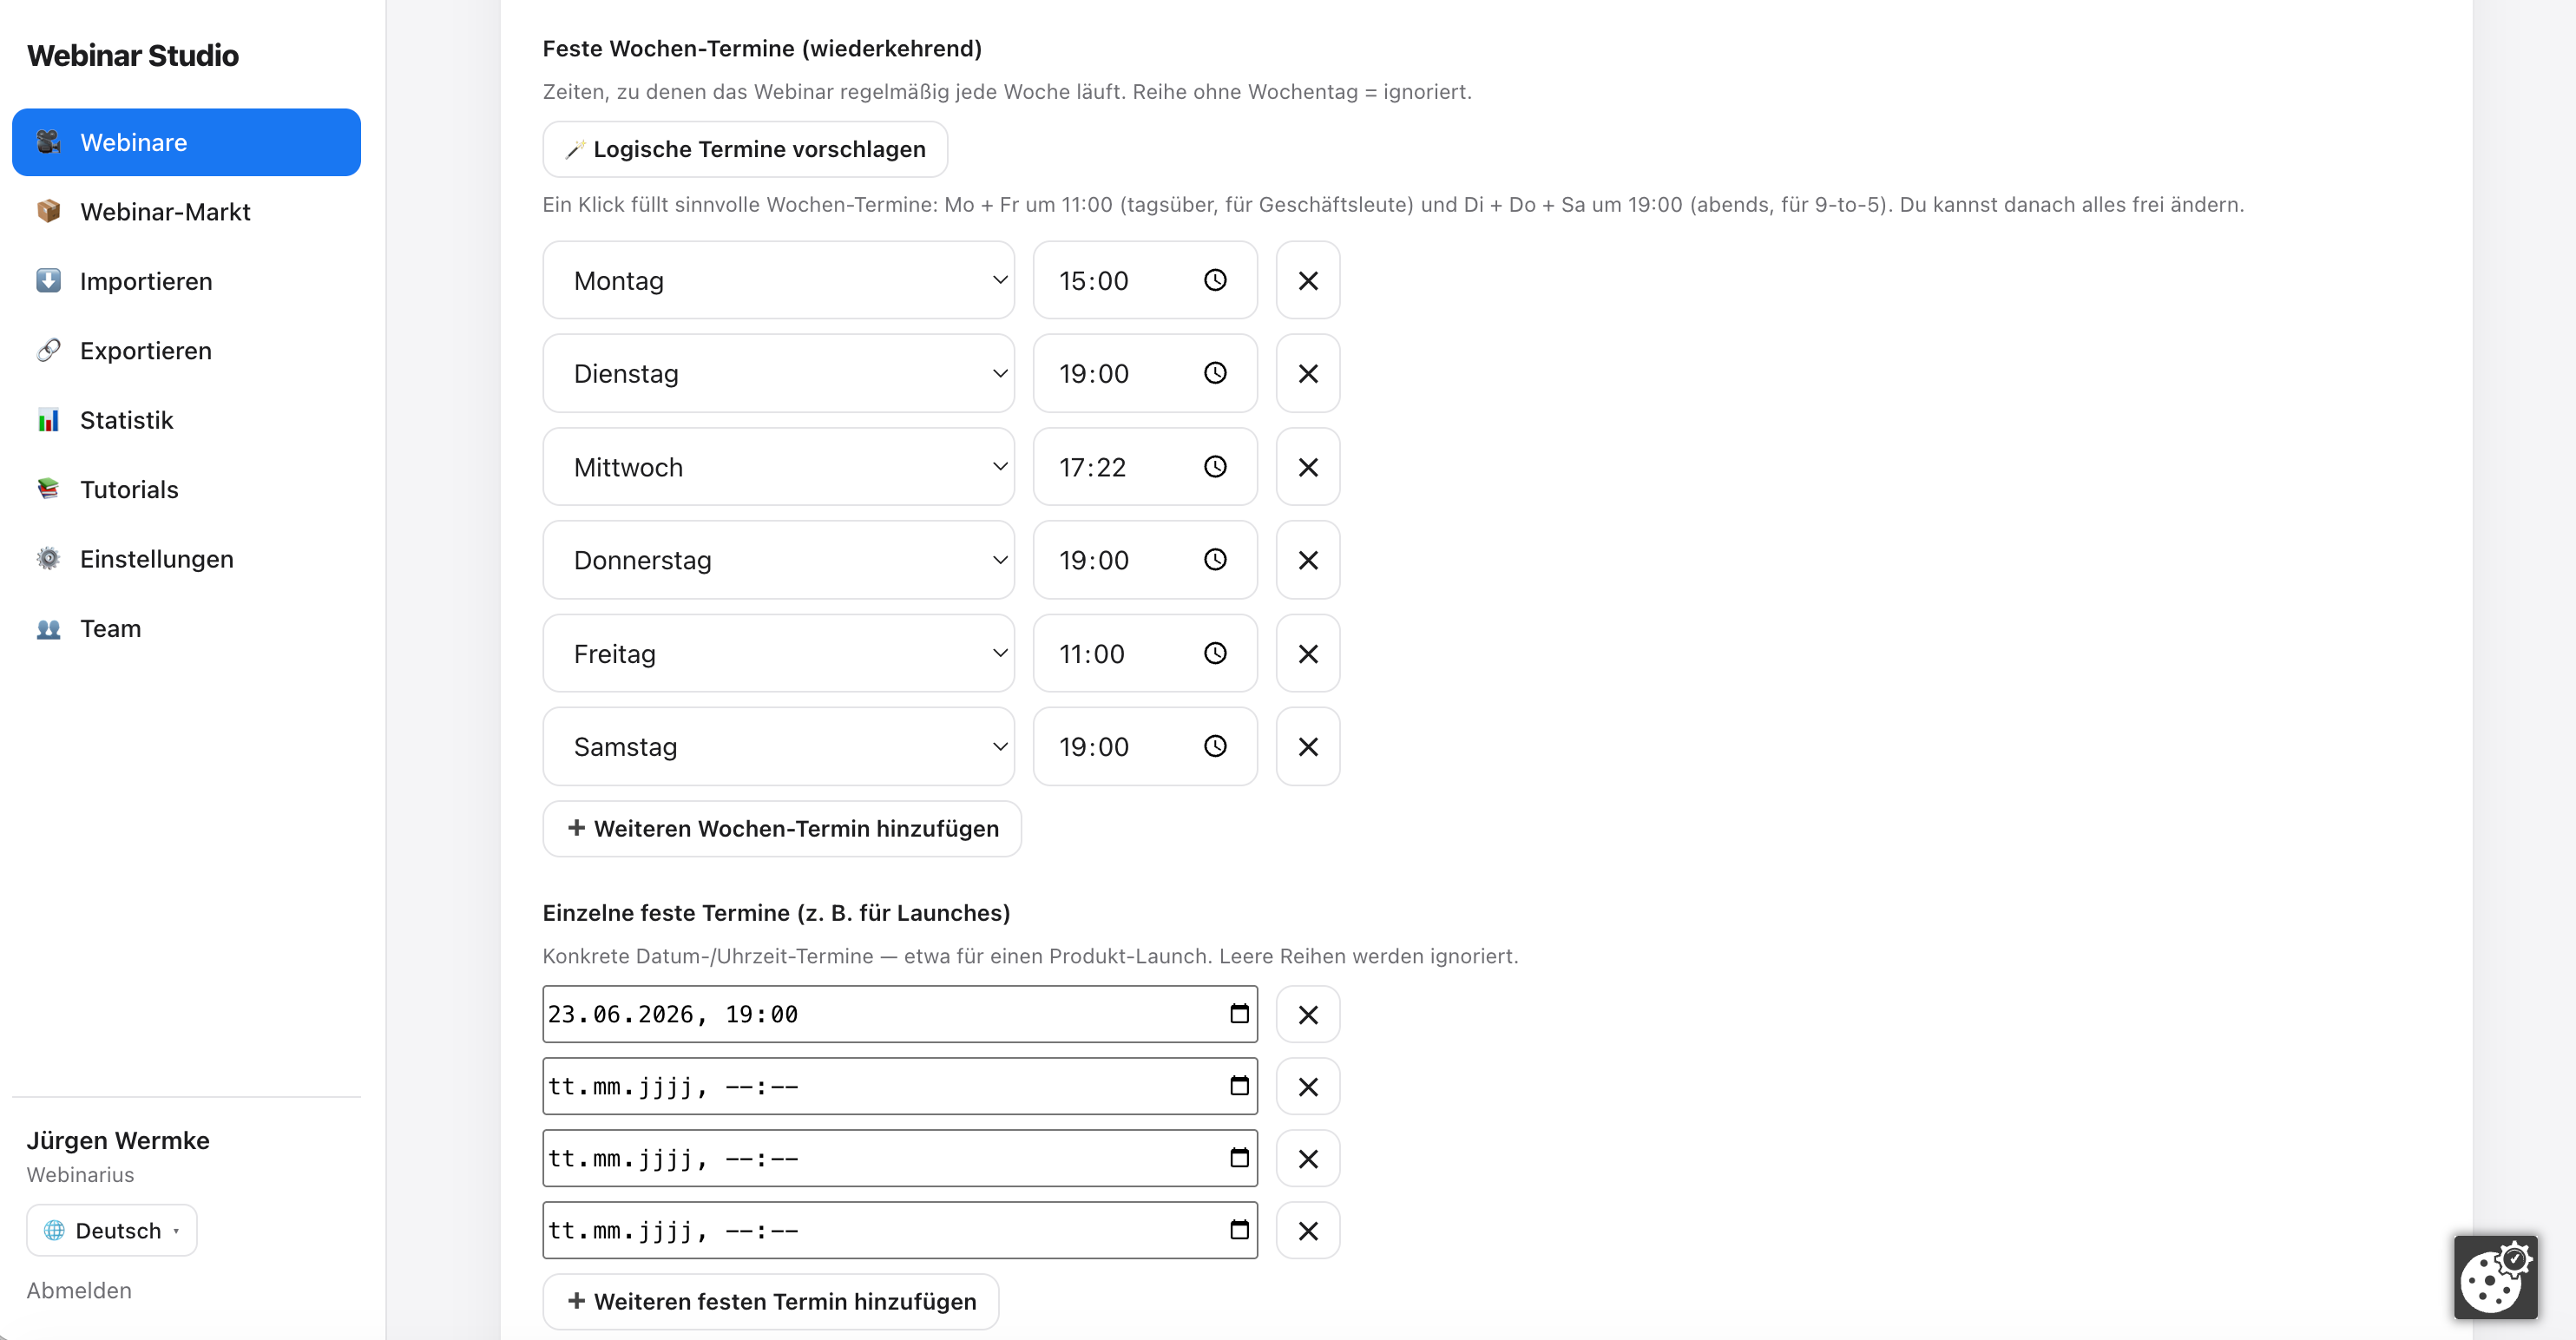
This is how you decide when your visitors can attend your webinar.
Offer every full hour
Evergreen convenience: every visitor automatically gets the next free full hours in their local time (11 a.m.–9 p.m.). Ready to go instantly.
Recurring weekly dates
E.g. “every Monday 11:00 and 19:00”. Via “+ add another weekly time” you create as many as you like; the ✕ removes a row.
Single fixed dates
Specific date/time slots, e.g. for a launch. Again as many as you like via “+ add another fixed date”.
🪄 Smart dates
One click pre-fills sensible weekly slots (daytime and evening). You can change everything afterwards.
Launch lock — “Launch start on”: Want to share your webinar ahead of time, but nobody should get in before the big start? Enter the launch time here: before that moment not a single start is possible — even the “every full hour” slot stays locked until launch arrives. A shared or adopted copy inherits the lock from the original. Empty = no lock.
Time-limited offer — “Offer ends on”: If you enter a point in time here, the webinar is hard-stopped from then on: no new dates, and the sign-up page, room and recording automatically redirect to your backup address. Perfect for launch campaigns with a deadline. Empty = no expiry.
More useful fields in Step 2: Recording available (how many hours the replay link is valid), Webinar size (seats – feeds the seat scarcity and the viewer counter), light/dark look, and the redirect at the end.
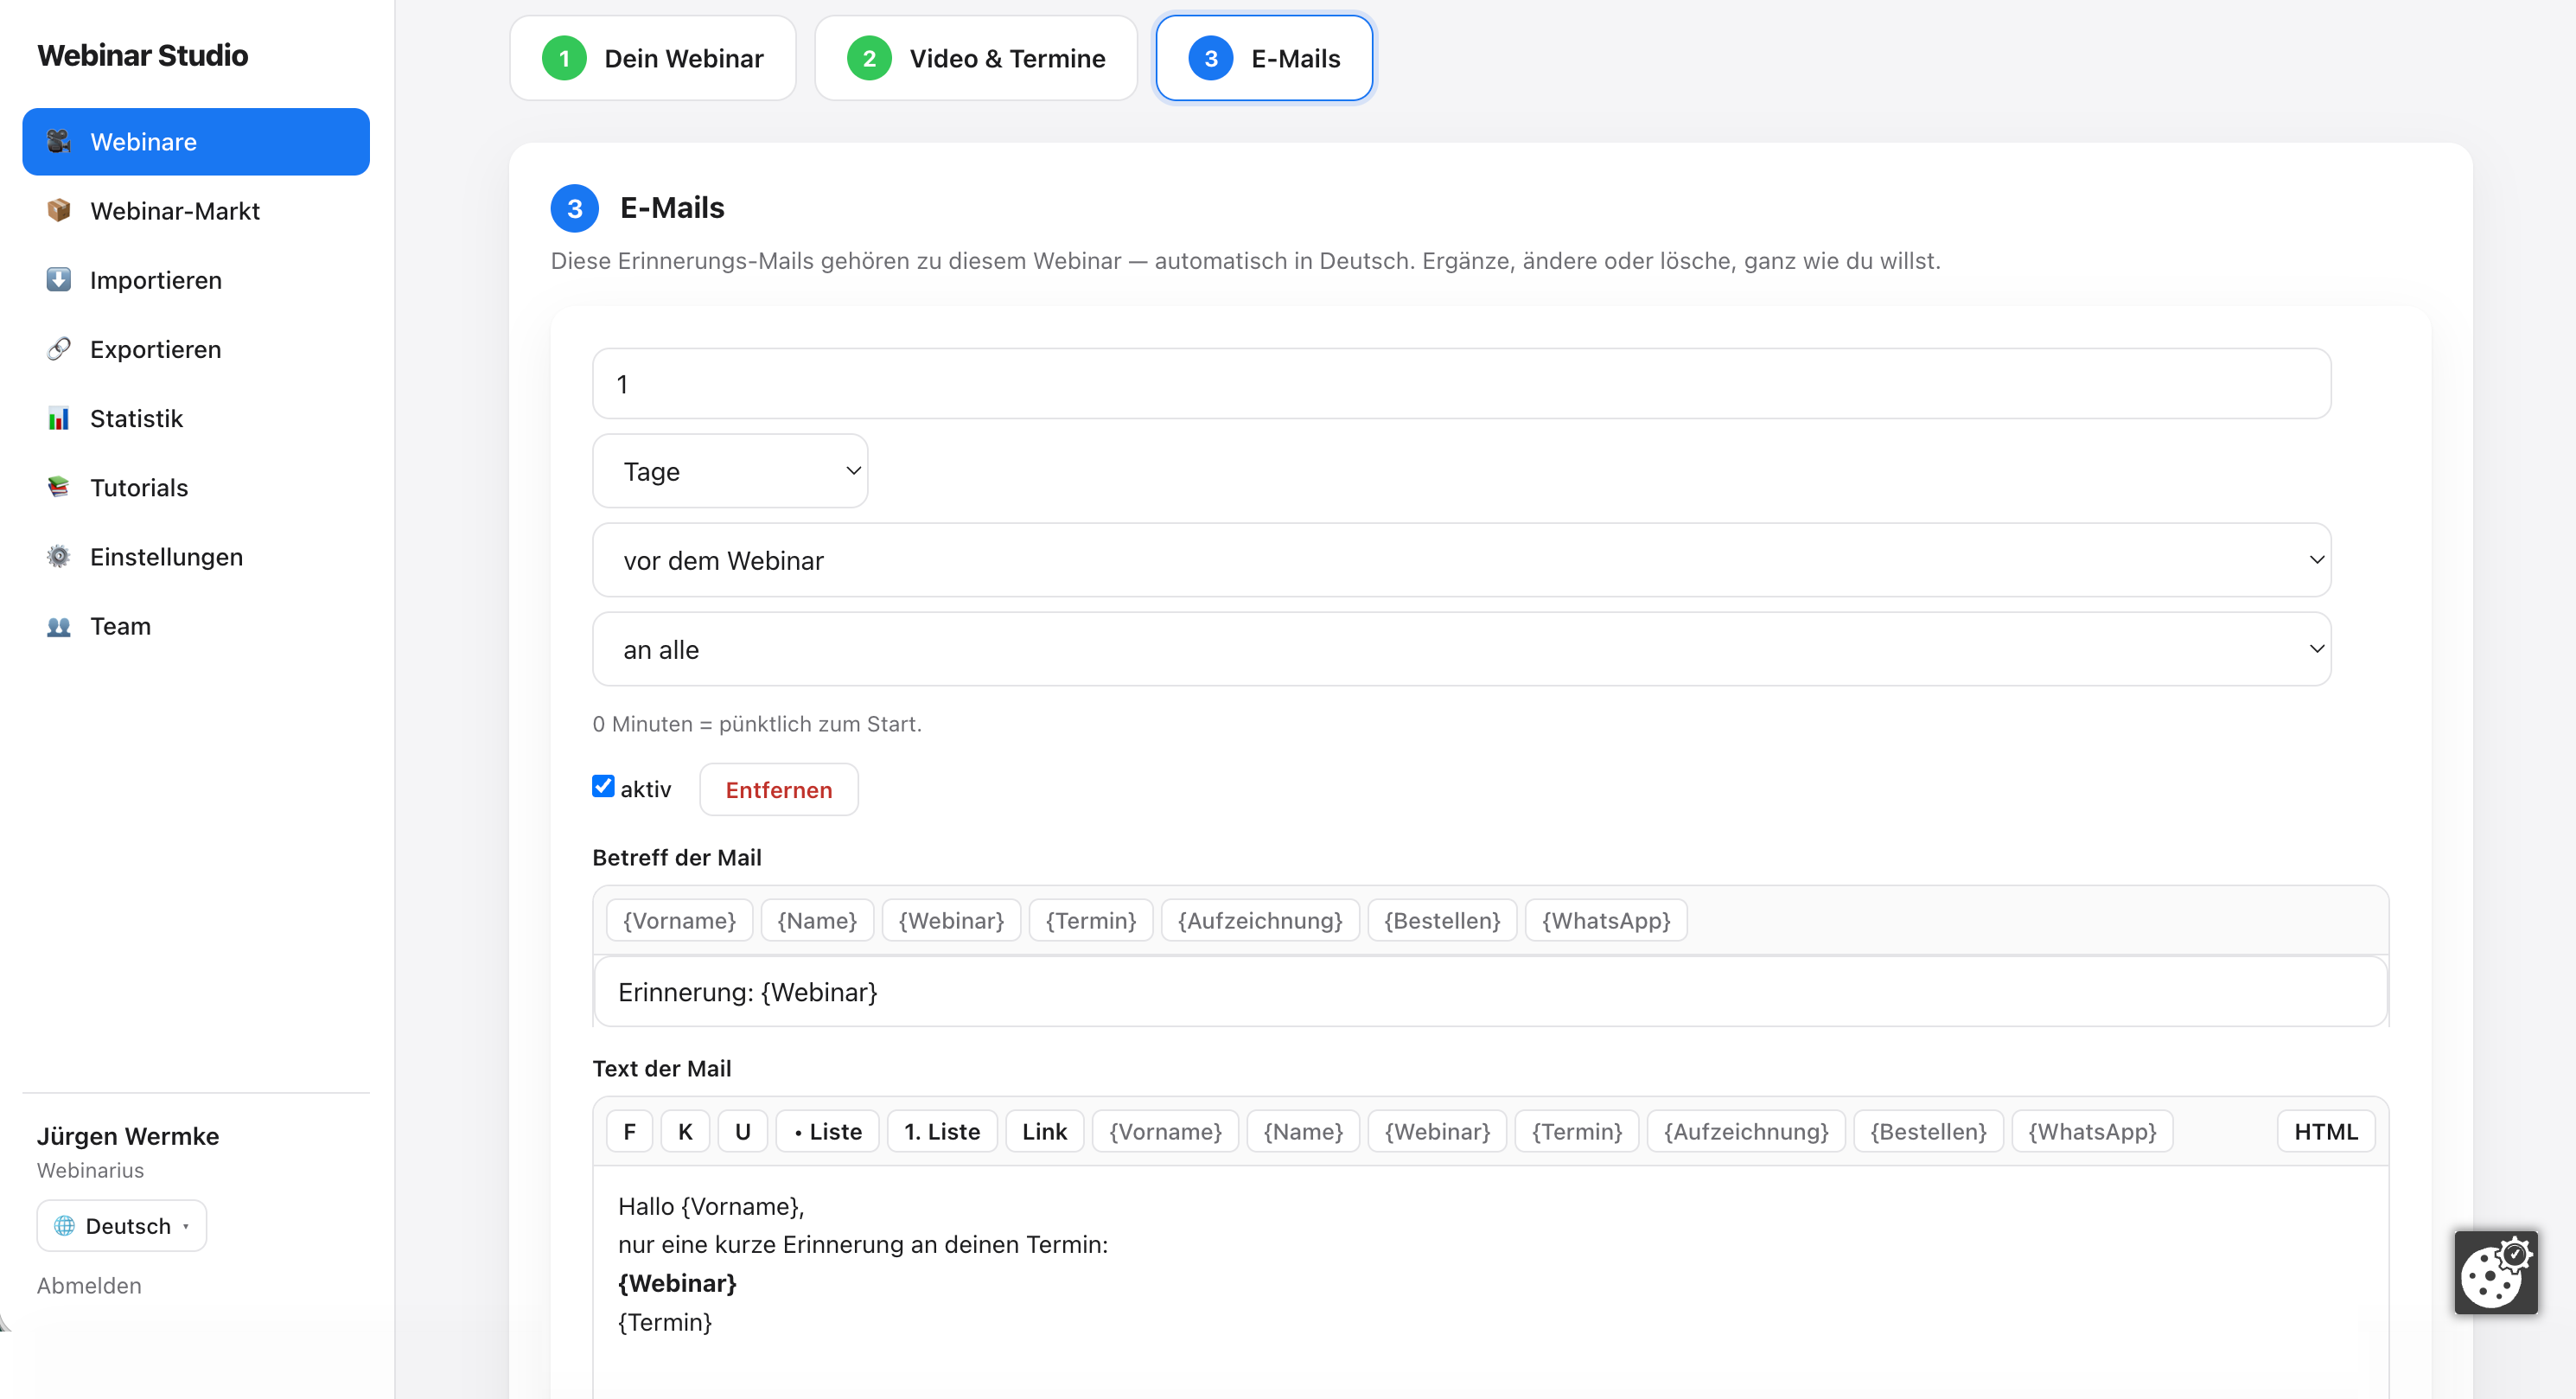
The reminders your registrants receive automatically.
Webinar Studio sets up default reminders for you in the webinar's language (e.g. 1 day before, 1 hour before, at start).
You can freely edit or switch off each e-mail, add new ones, or set up after-mails (sent after the webinar).
In the subject and body you can use placeholders: {Vorname} (first name), {Name} (name), {Webinar} (webinar title), {Termin} (date). These tokens stay the same in every language.
Done — with Save your webinar is ready to go.
Sending: The e-mails go out automatically as soon as someone signs up and picks a date. You don't have to do anything else.
Set your webinar live: In Step 2 you tick “active”. Only then is your sign-up page publicly reachable.
The fastest path: take a finished webinar with one click — and just put your name on it.
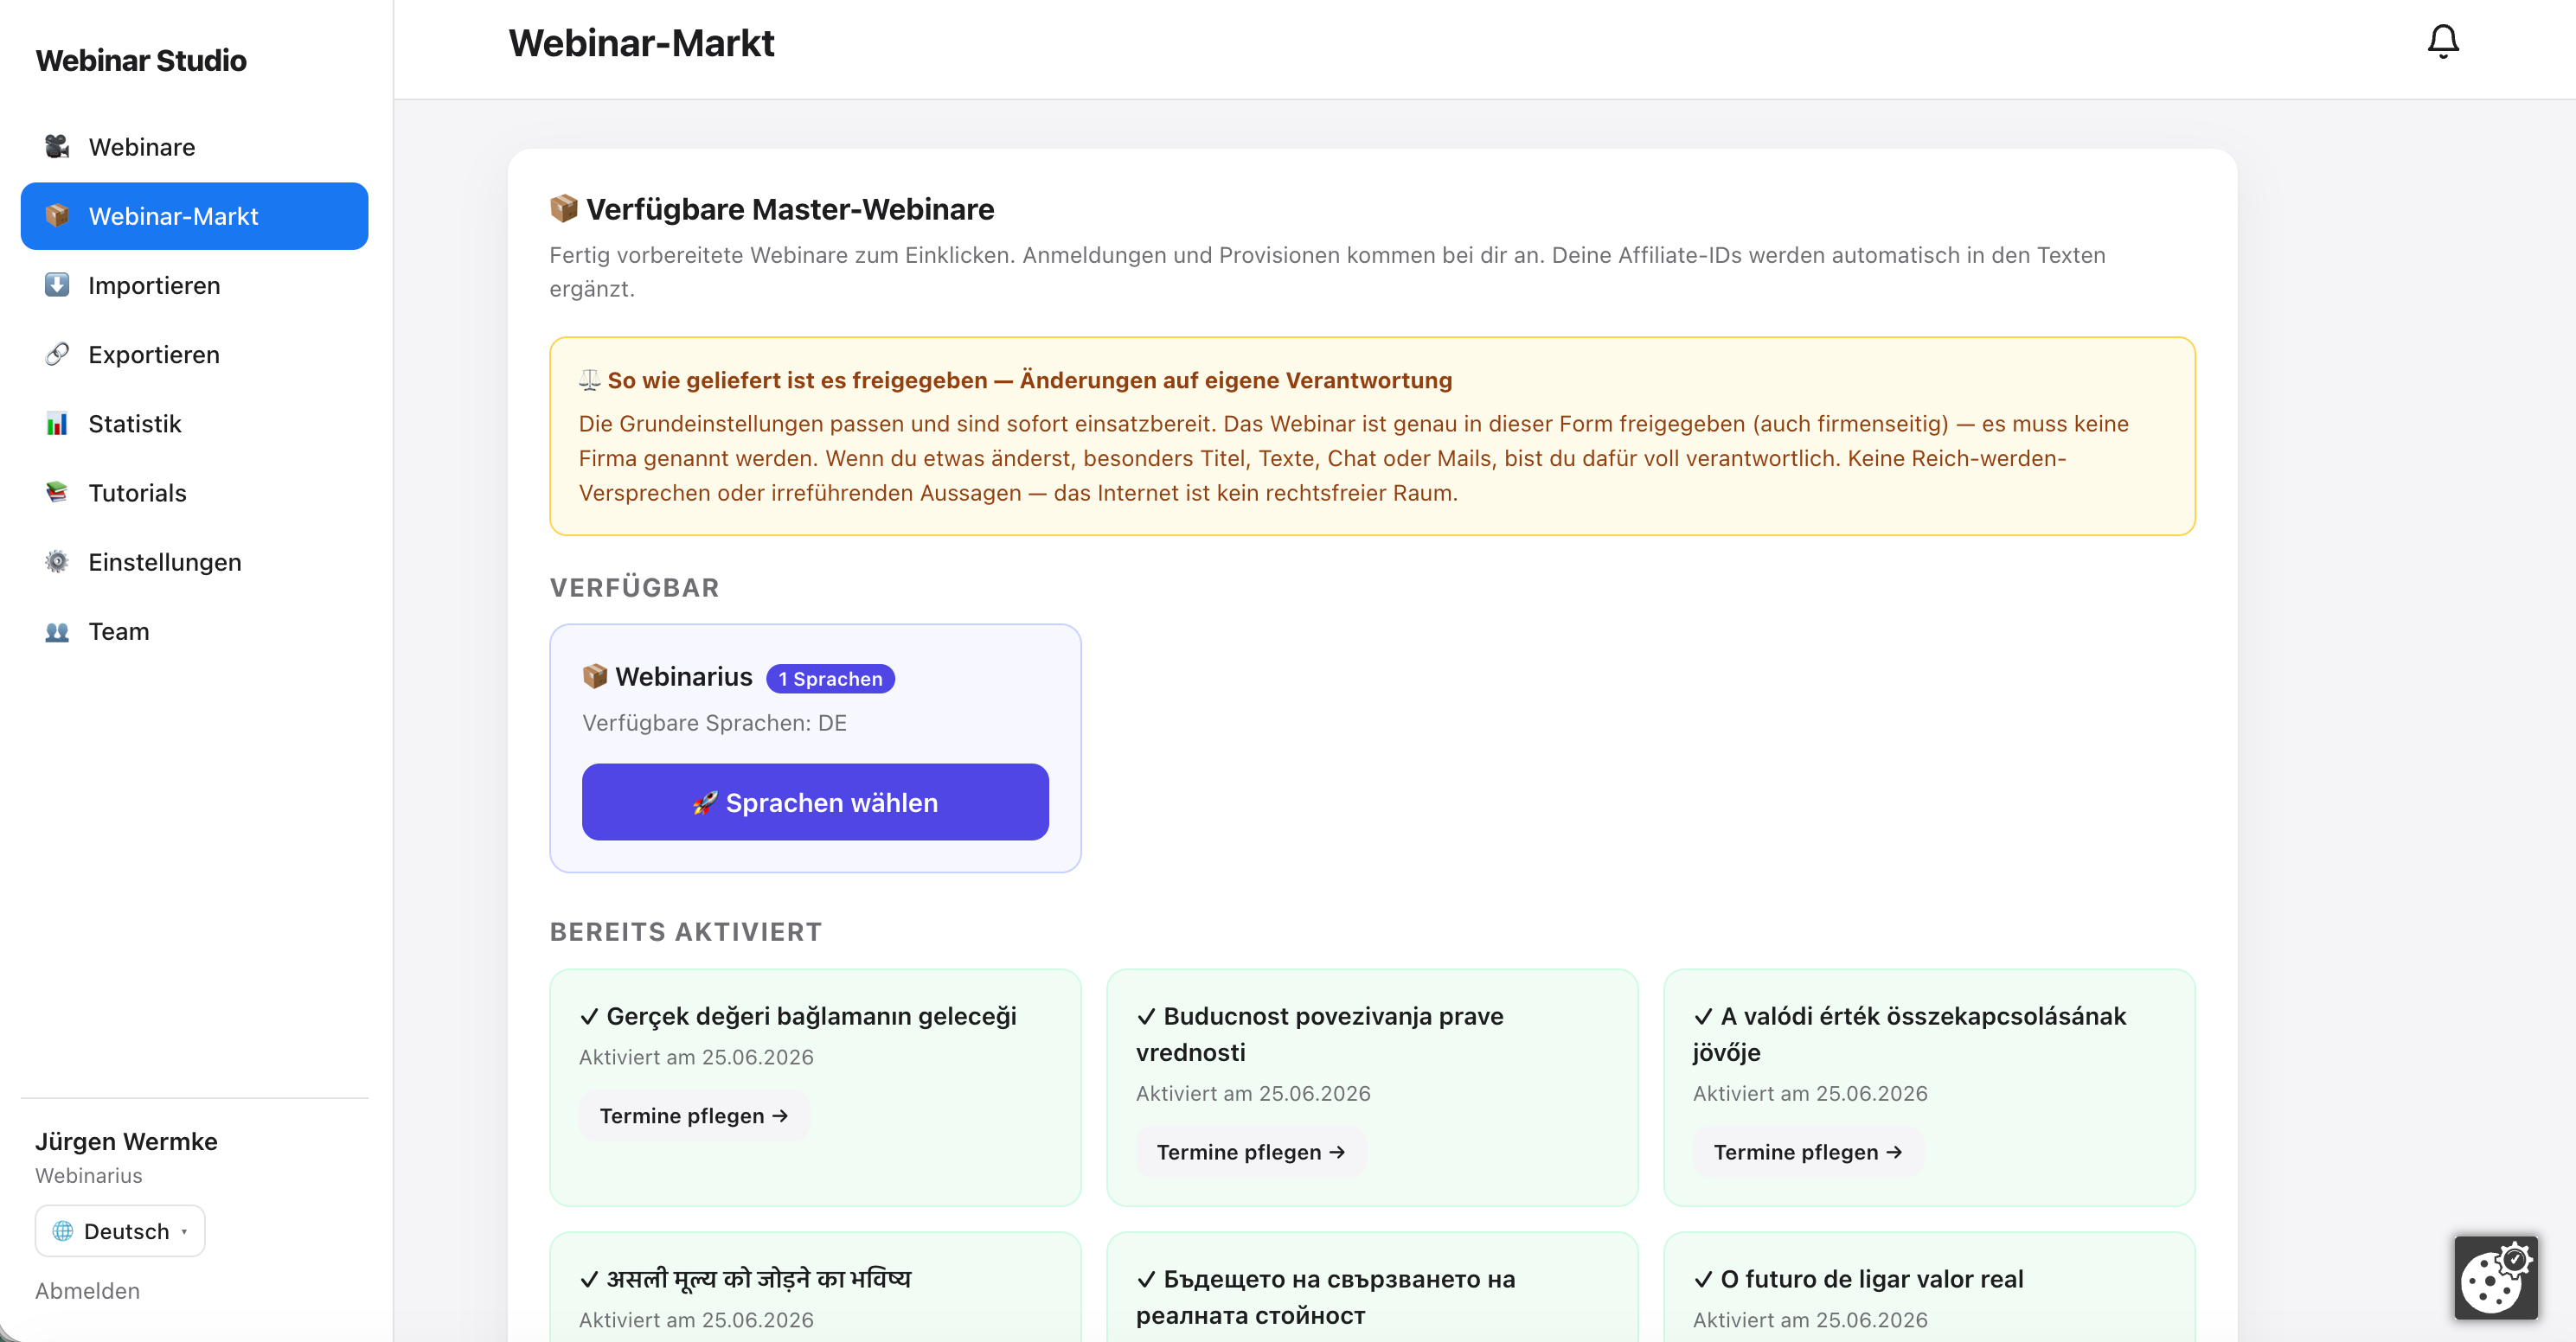
Open the Marketplace / Catalog in the left-hand menu.
Pick a finished webinar (they come in several languages) and click “Use it”.
Webinar Studio instantly creates a finished, own webinar for you — with its own short link. It appears in your overview.
Now just adjust it: title, sign-up page, dates and e-mails are yours and fully editable.
Important — only the film is locked: With a catalog webinar, only the video (and its length) stays tied to the original. That's on purpose: if the original video is updated, all webinars based on it instantly play the new version — so the content stays correct. Everything else — title, description, sign-up page, dates, chat, all e-mails — you may change freely.
Money routing: The texts of such webinars contain placeholders like {aff:conr}. They are automatically filled with your partner ID (chapter 9) — so the commission runs to your account.
Your visitors sign up right on your own page — Webinar Studio runs invisibly behind it.
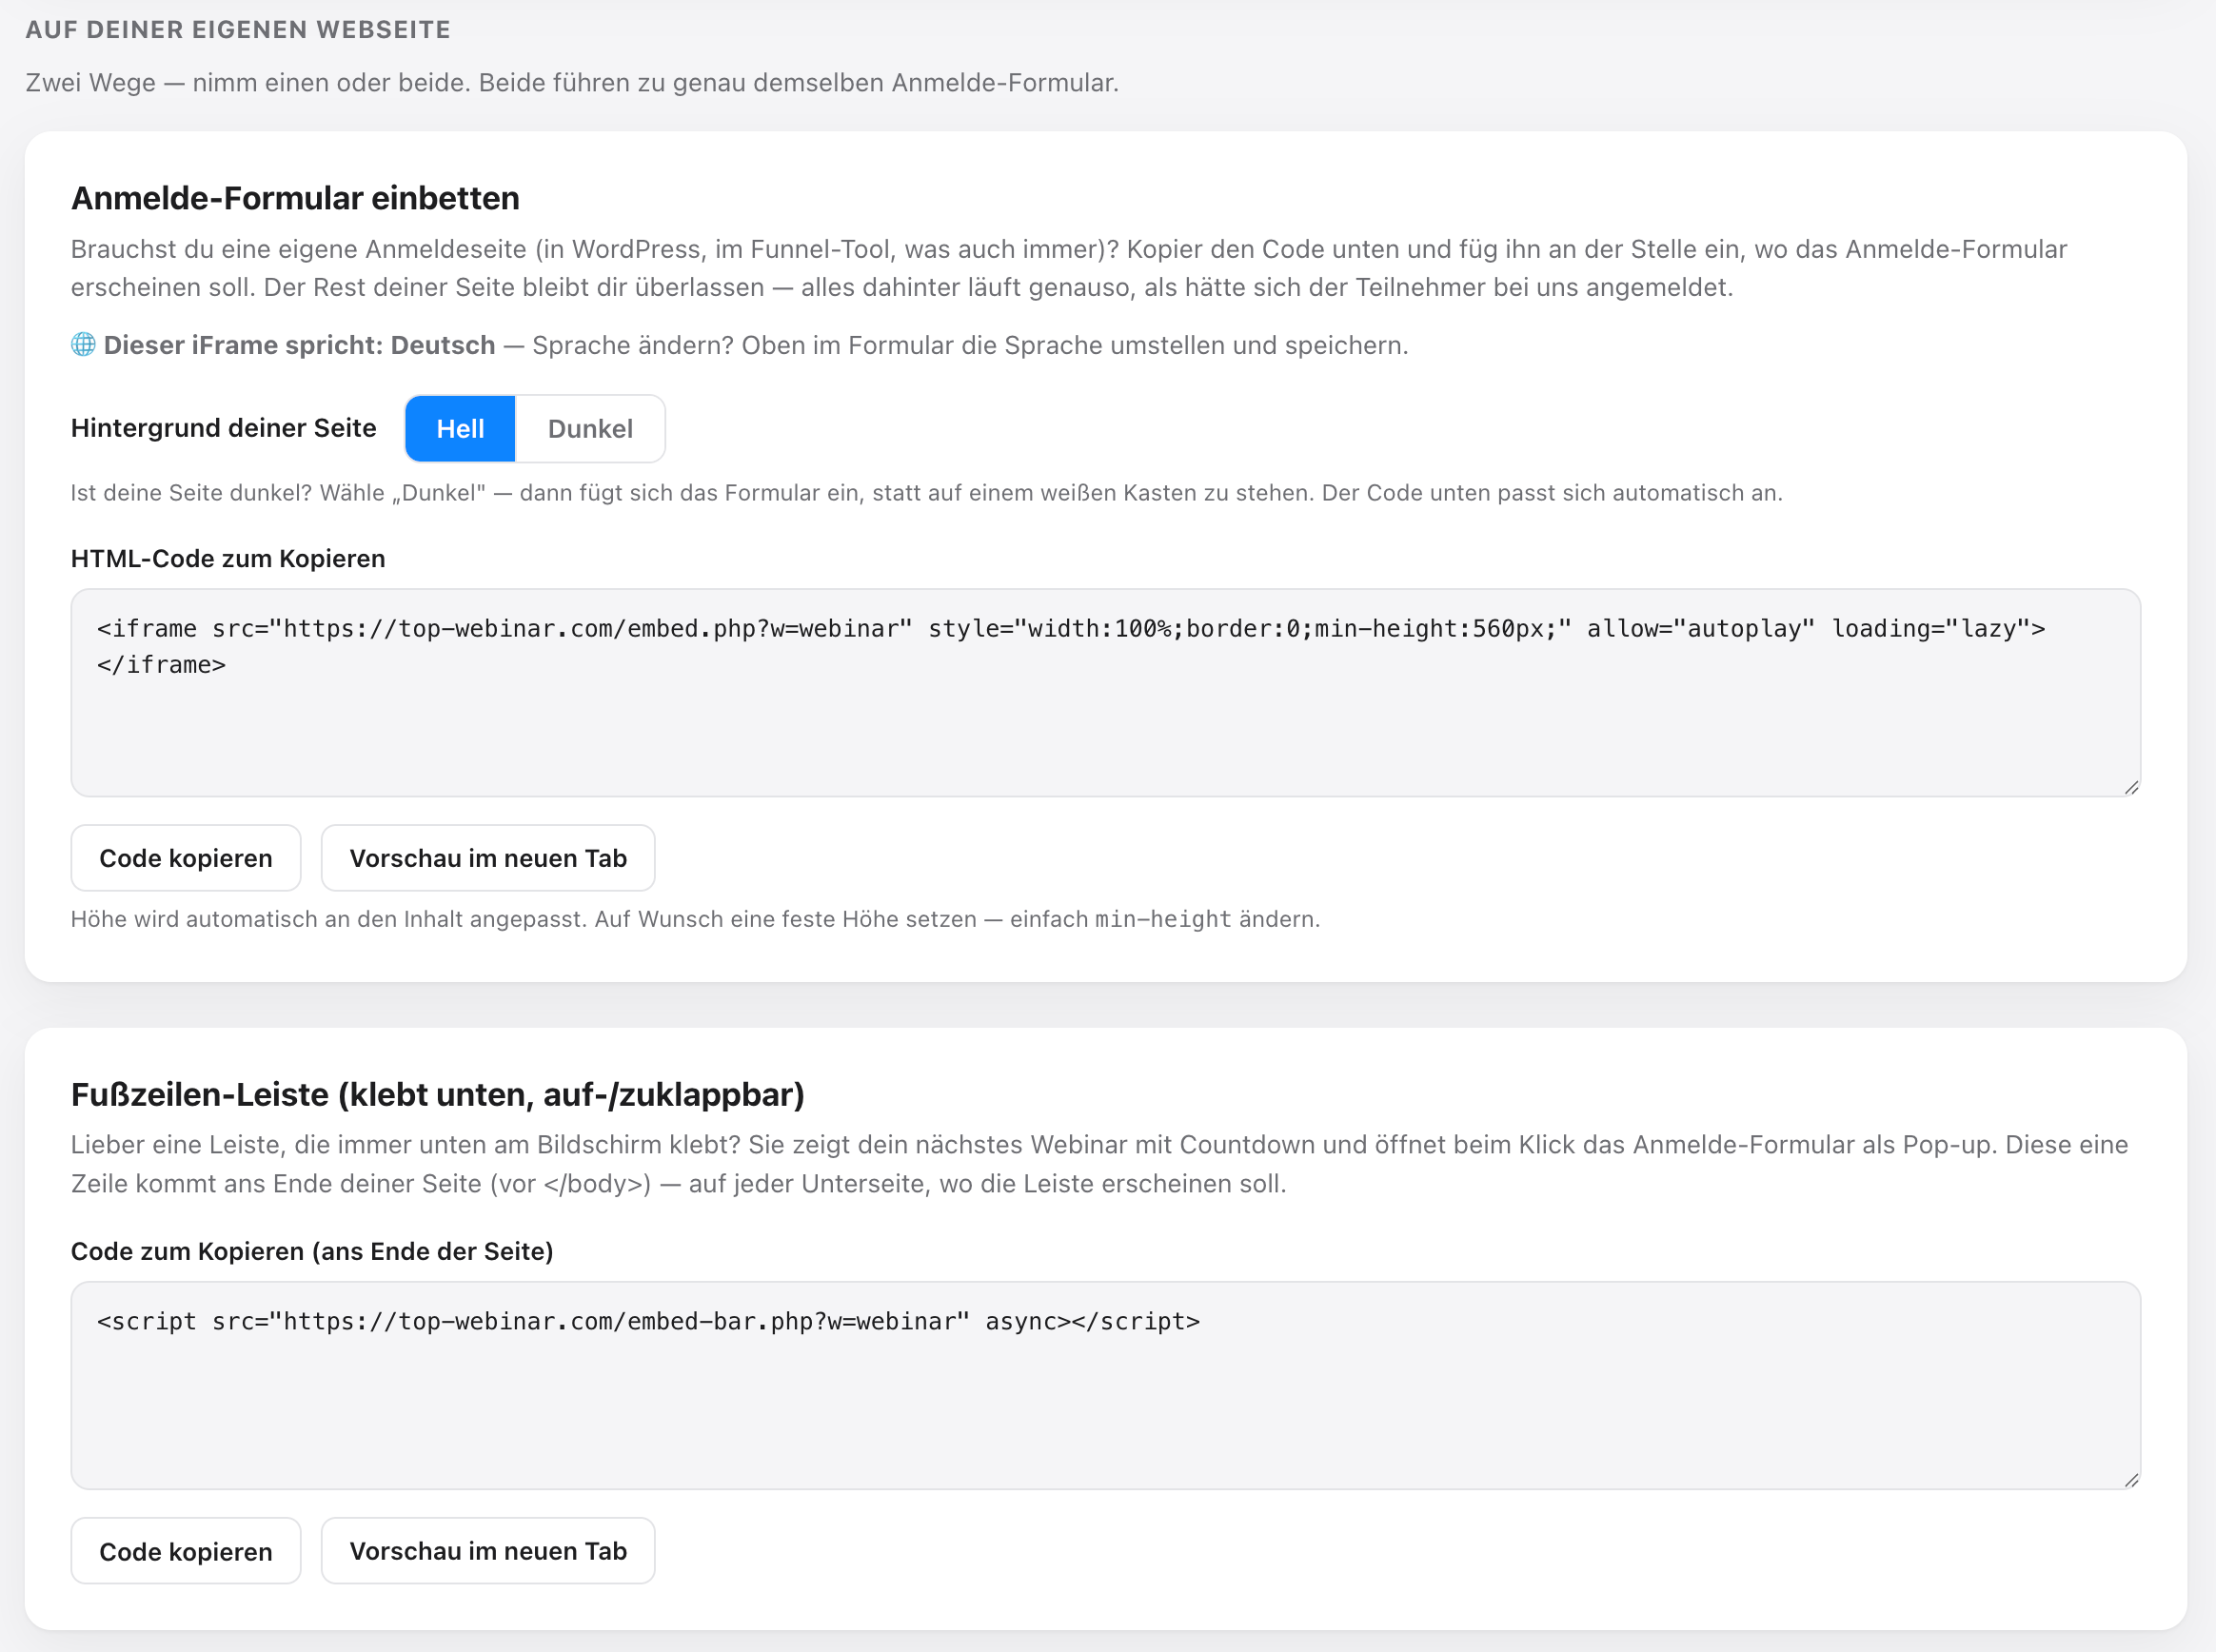
Already have a website (WordPress, funnel builder, whatever)? Then you don't have to send your visitors to a Webinar Studio page — you bring your webinar to them. In the webinar editor you'll find the section “On your own website” with two ready-made blocks to copy:
Sign-up form
The date picker plus sign-up as a small block (iFrame). You place it exactly where visitors should register on your page.
Footer bar
A slim, sticky bar at the bottom showing the next date and a live countdown. One click opens the sign-up as a pop-up — no second form needed.
Open your webinar → section “On your own website”. Both code snippets are there.
Copy and paste: the form code where you want it on your page, the bar code at the end of the page. That's it — you never touch the code again, only the new file on your server.
Light or dark? Above the form code you choose whether your page is light or dark. The code adapts automatically so the form blends in — no white box on a dark background.
Both blocks to copy — the sign-up form (iFrame) and the sticky footer bar, each with a light/dark switch.
Everything stays with you: When someone signs up via your page, everything runs exactly as if they had registered directly on Webinar Studio — same dates, same e-mails, same recording. The cookie notice is handled by your own website; the embedded form does not bring a second one.
Optional extras that bring your room to life — on the “Chat & Offer” page.
Chat script
Prepared messages that appear in sync with the video time — the chat feels lively. Real messages from your visitors can be added to the script with one click.
Offer button
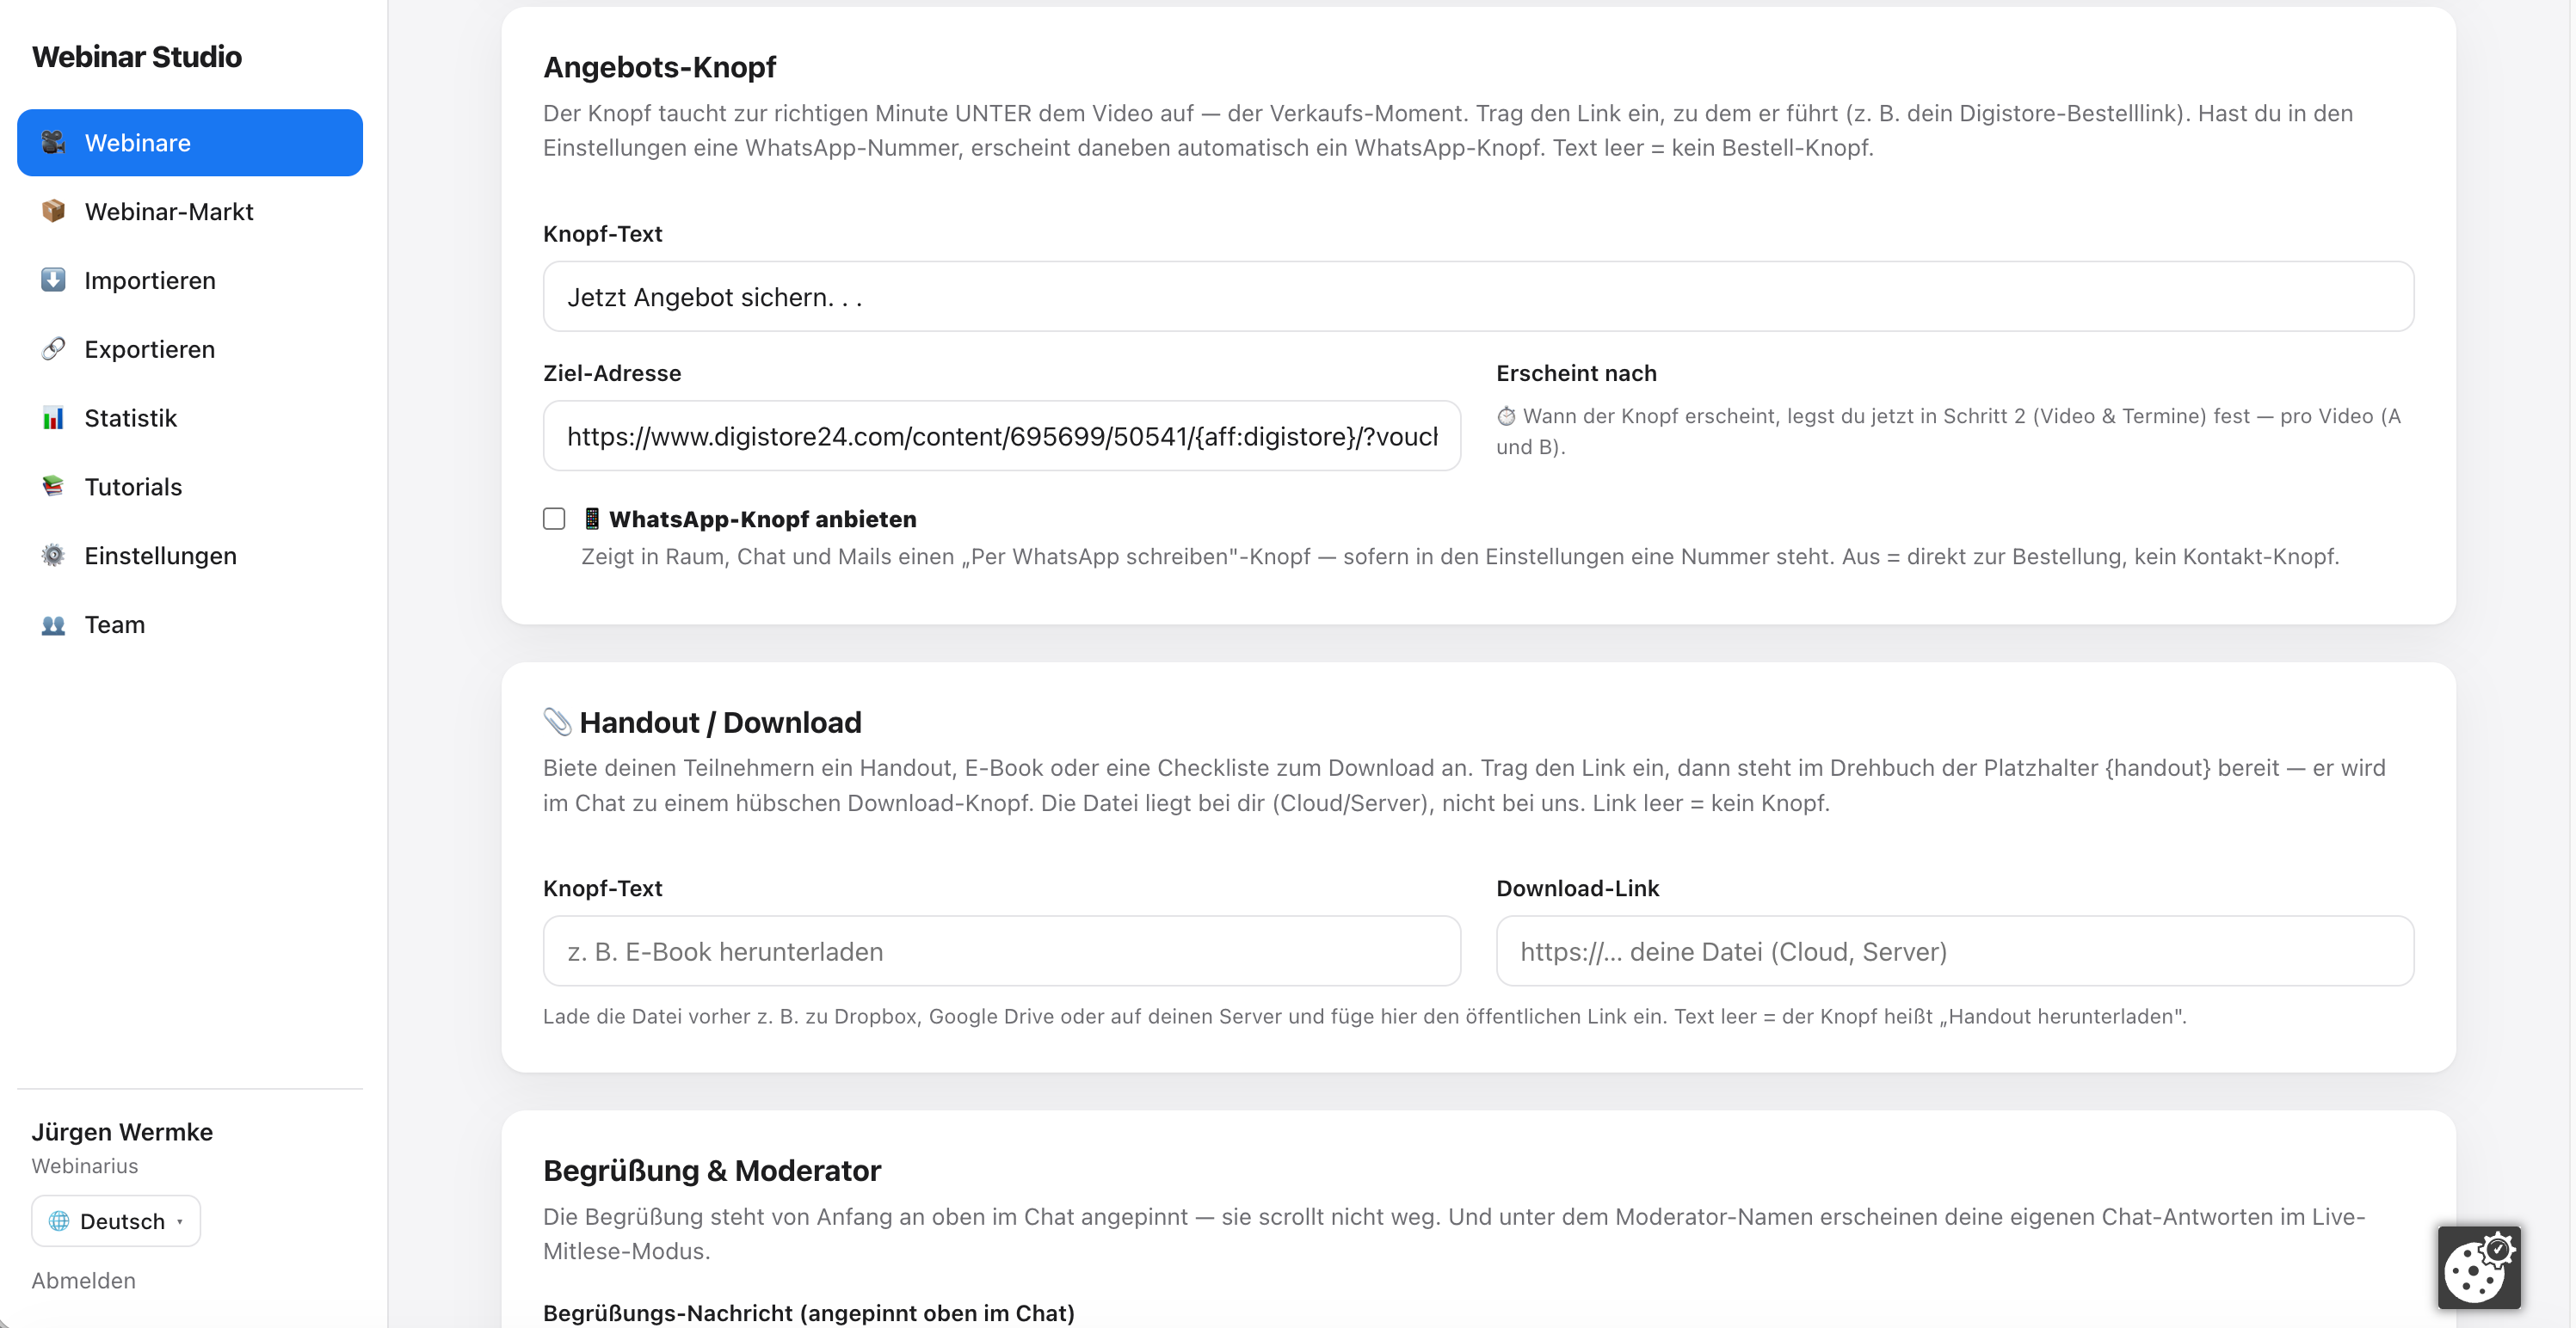
Here you set the text and link of your order button. When it appears you set in Step 2 (offer minute).
Pinned message
A pinned moderator message, optionally visible only within a time window.
📱 WhatsApp contact
Its own section: a “Message on WhatsApp” button in the room, chat and e-mails. Your account number applies — or you set a separate number per webinar. You also set the pre-filled message text per webinar — ideal for ManyChat keywords, the language, or to recognise which webinar the message came from. Plus the handout download.
Placeholders in the chat: With {bestellen} (order), {whatsapp} and {handout} you place the buttons directly into your chat messages.
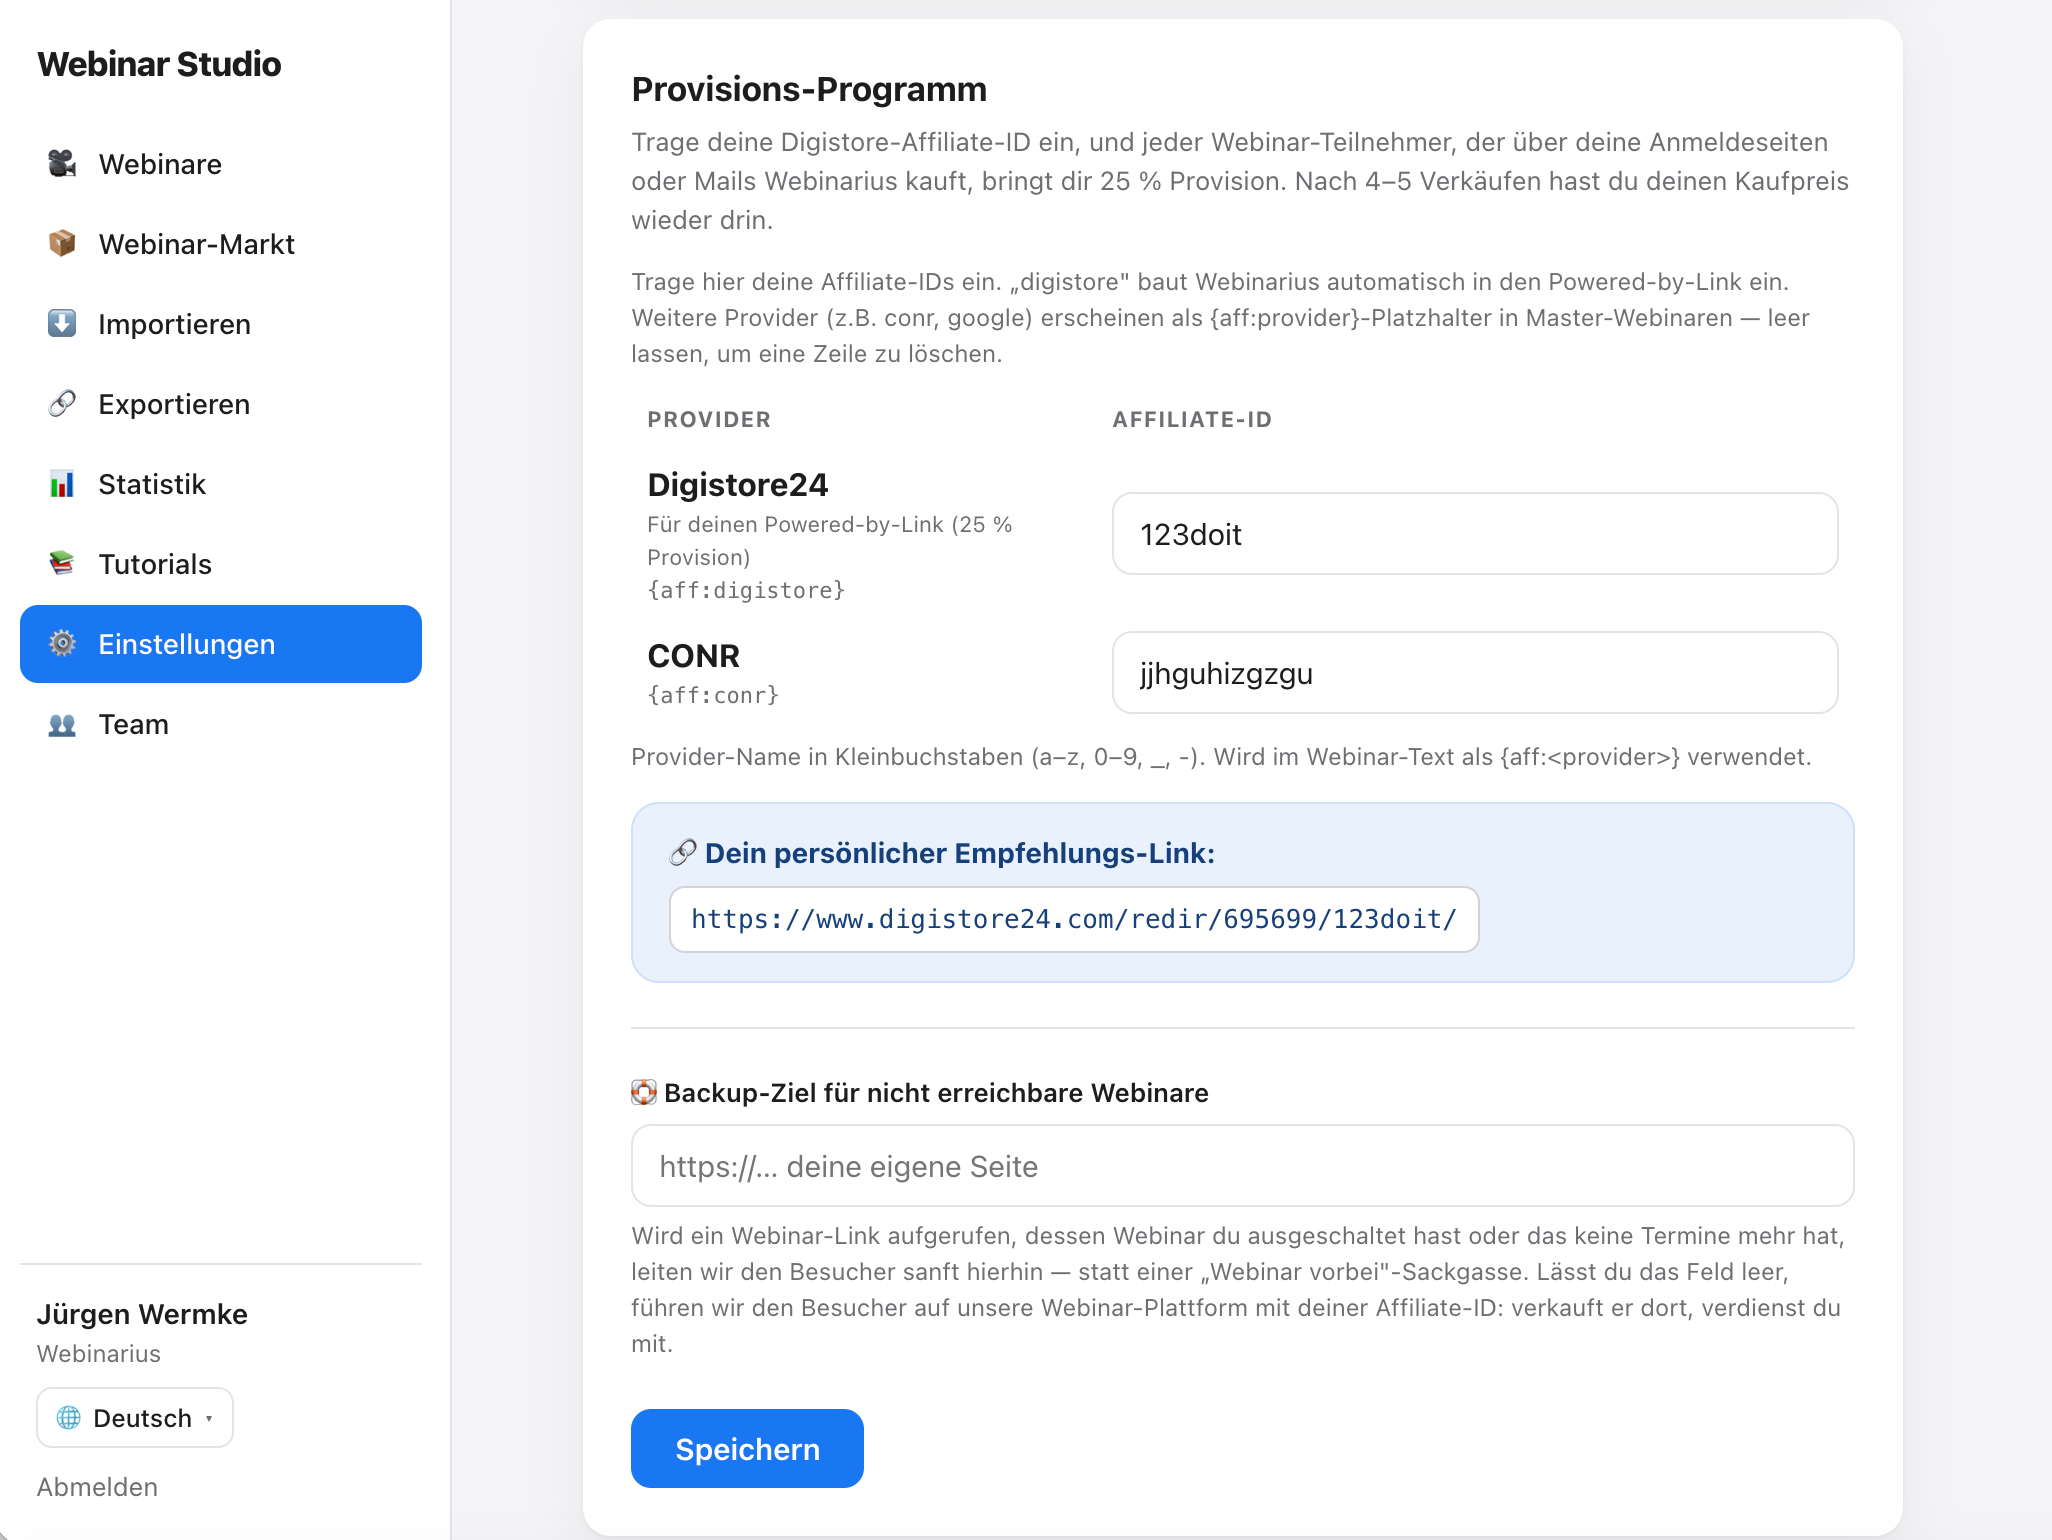
Enter your partner IDs — then every commission runs to your account.
Open Settings → Account and scroll to the Referral program.
Enter your affiliate ID at Digistore24. Token: {aff:digistore}. With it, Webinar Studio automatically builds your “powered-by” referral link (25 % commission).
Other partners (e.g. {aff:conr}) go into their own row. The token is always shown right under the name.
How it works in text: If you write e.g. {aff:digistore} in a webinar or an e-mail, Webinar Studio automatically inserts your ID when sending. Empty tokens simply vanish — a raw placeholder never stays behind.
See the numbers, pass webinars on, manage your account.
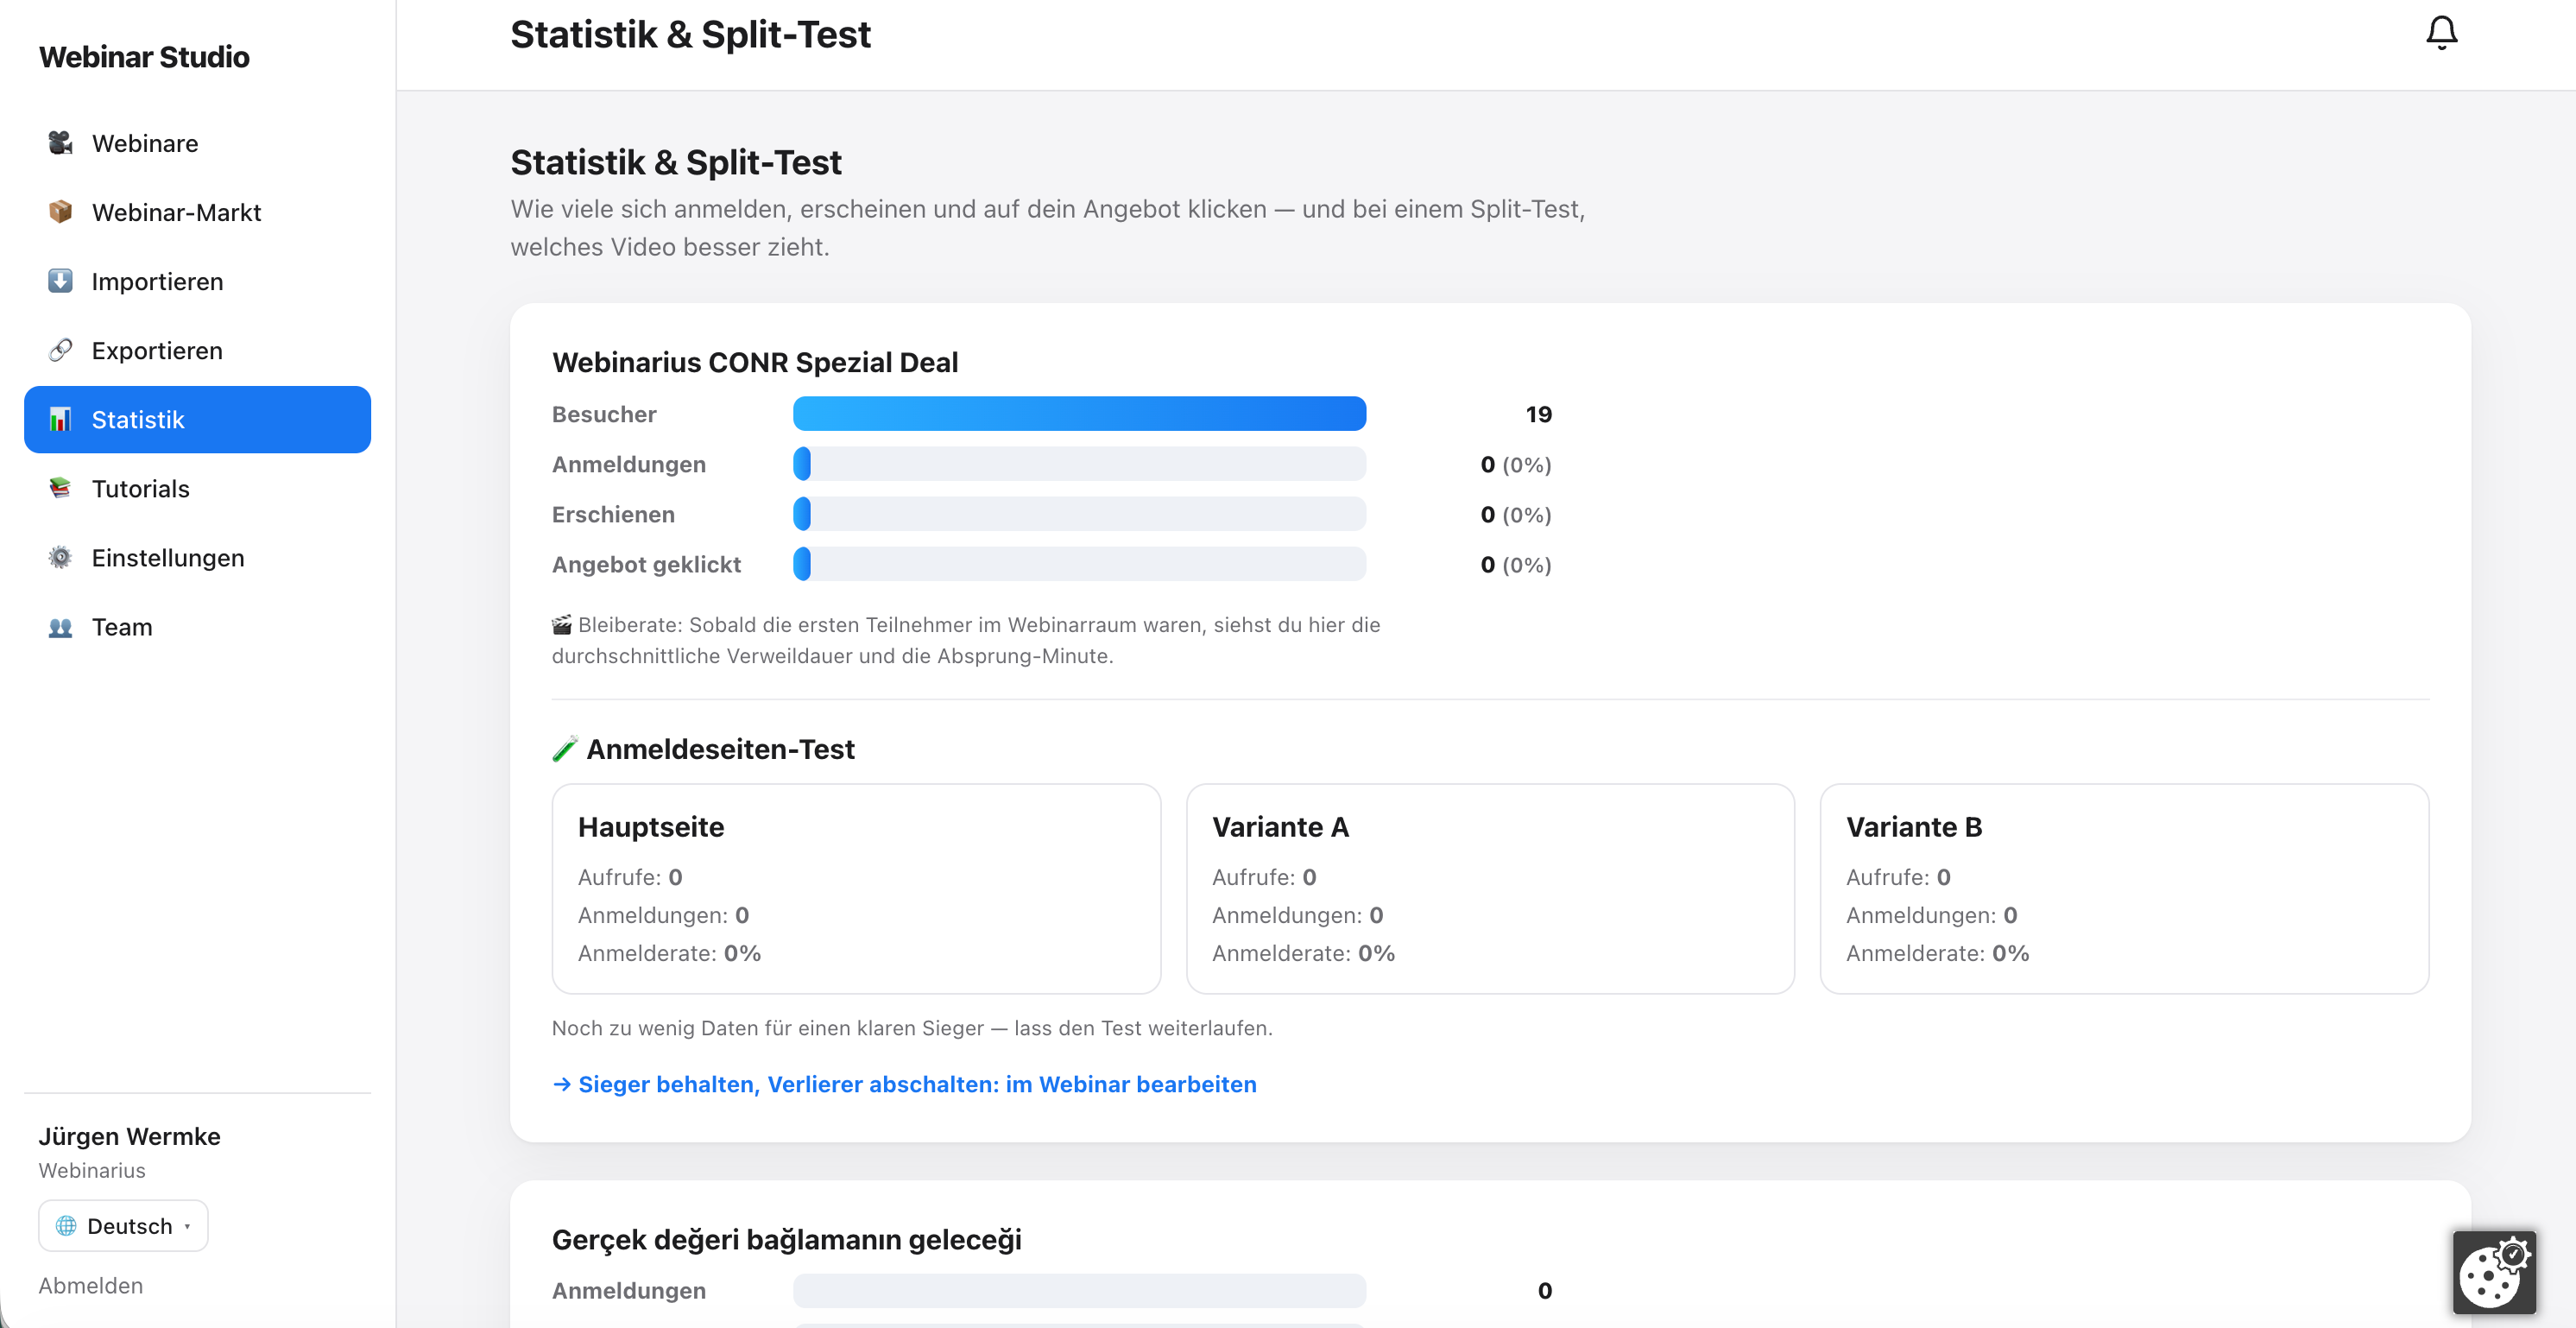
Statistics
The funnel from sign-up through attended to the offer click — plus the winner of your split tests.
Share & import
Pass your own webinars on by link (team / another installation); the recipient pulls them in under “Import”.
Account & team
Company name, logo, time zone, e-mail sender name, members with roles, and two-factor security.
Language & look
The admin area comes in 10 languages; each webinar you set to light or dark.
Plan & invoice
Under Settings → Plan you see your current plan (clearly marked), your invoices, and can upgrade or downgrade any time.
Recording: After the webinar every attendee automatically gets the replay link. The recording runs in your branded player — viewers can pause and resume (and continue where they left off when they come back), but not fast-forward.
Your own custom domain (Deluxe): On the Deluxe plan you use your own domain for the sign-up pages — set it up under Settings → My domain.